
Exploring Queues
Overview
This module explores the effects of queues on packet loss and delay using UDP traffic. Students will use iperf to send UDP traffic from a source to a destination through an intermediate bottleneck router which will develop a queue. We will then adjust the queue size to demonstrate its effects on packet loss and delay, shedding light onto how queues function.
Setup Time: Varies
Tutorial Time: 15 minutes
Objectives
Upon completing this module you will:
- Be able to throttle traffic on a router
- Be able to adjust the queue size of a router
- Understand the effect of queue size on packet loss and delay
Tutorial
A. Slice Creation and Instrumentation
This module assumes you are setup for and familiar with creating slices using the GENI Portal. Unlike some other modules, it is not assumed that you already have a slice created, or resources allocated. This module also assumes you are able to SSH into GENI nodes from your machine.
B. Video
If you haven't already, watch the video above. It will walk you through the steps of the module.
C. Set up the slice
1. Login to GENI Portal and click create slice to create a new slice.
2. Click Add Resources and select appropriate rspec for the module ("GeniEdu-09 Exploring Queues"), and any InstaGENI aggregate, then click Reserve Resources. This will create an RSpec that looks like this:
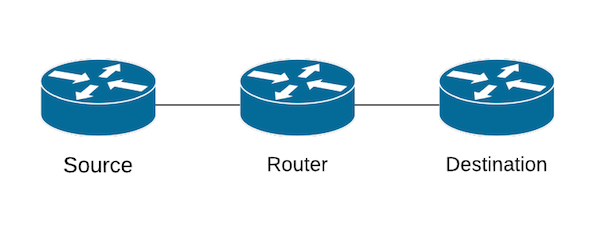
3. When your resources have been allocated (check the resource details page), open four SSH shells and log into the Destination node, the Router node and two instances of the Source node.
D. Measuring Loss and Delay
1. Since we will be sending UDP traffic from the Source to the Destination, we will need to set up the Destination to receive UDP traffic as follows:
iperf -s -u
2. For each of our experiments, we will be measuring two things: packet loss and packet delay. We will use our two connections to Source to measure these two things. In one source, type but do not send the following command:
ping destination
This command will send out a "ping" to the Destination every second and report back its RTT (round trip time), a measurement of packet delay. (Note: To stop the ping command, use Ctrl-C).
3. On the second Source connection, type but do not send the following command:
iperf -c destination -u -b 20mb -t 10 &
This command will send the Destination node UDP traffic at a bandwidth of 20mb/s for 10 seconds. It will also report back the amount of packet loss it experiences.
4. We want to start these commands back-to-back so we measure the delay occurring for the duration of the UDP traffic. Start the iperf traffic then quickly start the ping command. When the iperf command ends and returns feedback, stop the ping command by using Ctrl-C.
5. In your iperf results you should see a readout similar to the one below showing 0/17007 (0%) packet loss:
[ 3] 0.0-11.4 sec 23.8 MBytes 17.5 Mbits/sec 0.086 ms 0/17007 (0%)
Your ping results should show a fairly consistent RTT over its duration.
6. Make sure you are comfortable with this process and understand how to read the packet loss and delay from the iperf and ping results. The rest of the module will follow this same format.
E. Throttling the Router
1. In part C, we sent traffic at a bandwidth of 20mb/s and saw no loss and low delay. This is because our routers can handle much more than 20mb/s of traffic. In order to see queueing behavior, we must throttle the rate at which the intermediate router forwards traffic to be lower than the rate at which we are sending traffic. We will adjust it to send outgoing traffic at a rate of 18mb/s. Go to the Router shell and enter the following:
sudo tc qdisc add dev eth2 root tbf rate 18mbit limit 1000mb burst 10kb
This command will change the outgoing interface to send at a rate of 18mb/s.
2. Now we will re-run our experiment from part C. In our two Source shells type, once again:
iperf -c destination -u -b 20mb -t 10 &
ping destination
Run the commands back to back, manually stopping the ping (Ctrl-C) at the end of the 10 second iperf traffic. As before, there should be no packet loss. Your pings, however, should show gradually increasing delay.
We can think of packets in queues like people waiting in lines. People arrive at the door at rate of 20 people per second but can only pass through at a rate of 18 people per second. So each second there will be an additional two people in the queue who could not pass through the door. As the line grows longer over time, the wait time of each person in the line also increases. This is why we see packet delay increase gradually for the duration of the traffic.
You may notice a sharp decline in delay at the end of your pings. The queue is filled with iperf traffic. When that traffic stream stops there are still stop packets remaining in the queue that must be sent. As these packets gradually exit the queue, the length of the queue decreases and as the length of the queue decreases, delay decreases as well. (Note: I'm using length to refer to the amount of packets on the queue at a given moment whereas size refers to the queue's total capacity.)
F. Finite Queue
Let's look again at our changes to the Router in the previous experiment:
sudo tc qdisc add dev eth2 root tbf rate 18mbit limit 1000mb burst 10kb
In addition to the throttling the send rate, we also adjusted the limit to 1000mb and burst to 10kb. These effectively changed the size of the outgoing queue on the Router. Limit refers to how much information can we store in the queue before we begin dropping packets. (Note: Burst is a space allocation used to shape incoming traffic into the desired outgoing rate and is not important to understand for the purpose of this module.)
In our metaphor of people entering a door, the queue size is comparable to the maximum number of people allowed in the line before we begin turning people away. Each person we turn away represents a lost packet. Any packet that tries to get onto a full queue is dropped. For our experiment, a queue size of 1000mb was essentially infinite- we came no where close to filling up the queue. Thus, we saw no packet loss.
2. For our next experiment, let's adjust the queue size to 3mb.
sudo tc qdisc replace dev eth2 root tbf rate 18mbit limit 3mb burst 10kb
3. Now we'll repeat our experiment to measure packet loss and delay with our new queue size:
iperf -c destination -u -b 20mb -t 10 &
ping destination
4. Your results should show little to no packet loss and a delay results similar to the previous experiment. These are the same results from the experiment with an "infinite" queue. No loss means that the queue was big enough to accommodate all the traffic. Small amounts of loss means the queue was almost but not quite big enough to accommodate all the traffic. To see more loss, we will have to shrink the queue even more.
G. Smaller Queue
1. Let's adjust the queue size to 2mb.
sudo tc qdisc replace dev eth2 root tbf rate 18mbit limit 2mb burst 10kb
2. Rerun the experiment.
iperf -c destination -u -b 20mb -t 10 &
ping destination
3. Your iperf results should now show modest packet loss. This tells us that the queue was not large enough to handle all the incoming traffic and some packets were dropped.
Look back to your ping results. Your delay should peak and plateau. Compare these results to the previous experiment and you will notice that the delay growth is comparable until our most recent experiment reaches its peak where it plateaus for the remaining duration of the iperf traffic. This divergence indicates the point in time at which our new, smaller queue became full. The packet delay increases only as long as the length of the queue increases. When a finite queue fills up, its length becomes constant (equivalent to the queue's size) and thus the delay becomes constant also.
H. An Even Smaller Queue
1. Now let's make the queue even smaller. Adjust the limit to 100kb (0.1mb).
sudo tc qdisc replace dev eth2 root tbf rate 18mbit limit 100kb burst 10kb
2. Since our queue is even smaller, we should expect more packet loss and a smaller peak delay. If you're unsure why, take a moment to think through the experiment and convince yourself. Then re-run the experiment to confirm the results.
iperf -c destination -u -b 20mb -t 10 &
ping destination
Your results should show even more packet loss as well as a lower peak delay.
I. Conclusions
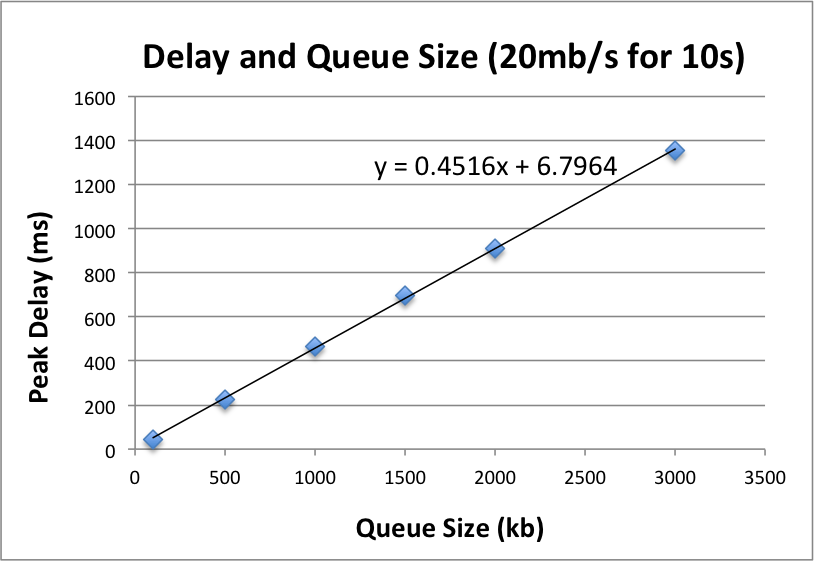
This experiment adjusted the queue size of a throttled router to demonstrate effects on packet loss and delay. We saw that delay gradually increases over time as the queue fills up, eventually reaching a plateau when the queue is entirely full. The peak delay (aka the delay when the queue is entirely full) is directly related to the queue size. This effect is seen clearly in following graph which shows results from the same experiment on some additional queue sizes (100kb 500kb, 1.5mb, 2mb and 3mb).
We saw a direct correlation between loss and queue size as well. Loss occurs when the queue is not big enough to accommodate the incoming traffic and packets must be dropped. The smaller the queue size, the more dropped packets.
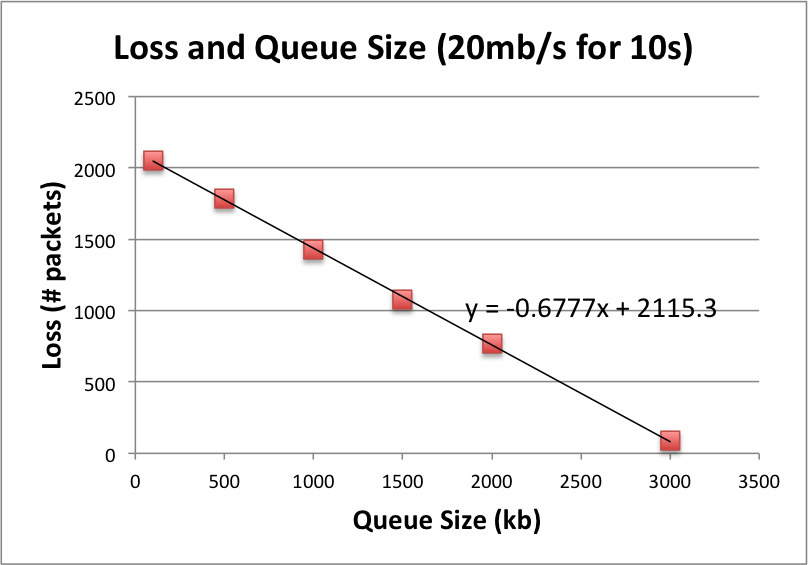
| Queue Size (kb) | Delay (ms) | Loss (#packets) |
|---|---|---|
| 3000 | 1354 | 89 |
| 2000 | 909 | 766 |
| 1500 | 699 | 1080 |
| 1000 | 465 | 1427 |
| 500 | 227 | 1786 |
| 100 | 45 | 2054 |
Going Further - Assignment
1. The tables and graphs in the conclusion showed the effects of queue size on packet loss and delay under the conditions of the experiment above. Consider re-doing the experiment with 20 seconds of UDP traffic instead of 10 seconds. How would the peak delay change in the 20 second experiment? How would the amount of packet loss change in the 20 second experiment? Since our 20 second experiment sends twice as much traffic, consider both number of packets and percentage of packets. Please explain your answers.
2. Redo the experiment with 20 seconds of traffic with the following queue sizes: 3000kb (3mb), 2000kb, 1500kb, 1000kb, 500kb, 100kb. Find a linear regression line for both peak delay and amount of packet loss. Consider your answers from part 1. Do these results match your expectations? Why or why not?
Shutdown
Upon completion of the module please delete your slice's resources as described in the Shutdown module.