|
 Features Features

Subdivision Surface
Theory
At Siggraph '98, Pixar
unveiled a short animated film.
Christened Geri’s Game, it was, to quote its Academy Award
press release, the “endearing tale of an aging codger who likes to play chess
in the park against himself.” Not only was it artistically stunning, but it
was also a technological powerhouse. The short served as a vehicle to
demonstrate Pixar’s latest addition to its production environment, a surface
scheme known as subdivision surfaces.
Subdivision surfaces are a way
to describe a surface using a polygonal model. Like the polygonal model, the
surface can be of any shape or size — it’s not limited to a rectangular
patch. Unlike that polygonal model, the surface itself is perfectly smooth.
Subdivision surface schemes allow you to take the original polygonal model
and produce an approximation of the surface by adding vertices and
subdividing existing polygons. The approximation can be as coarse or as
detailed as your needs allow. Because Pixar’s rendering system requires
everything to be broken into polygons that are a half-pixel across,
subdivision surfaces allowed them to tessellate automatically to that level
everywhere. As such, the artists didn’t need to worry about how close Geri
was to the camera. While your game probably can’t quite deal with half-pixel
polygons, whatever size you do choose, your models can scale up and down in
polygon count with the speed of the machine and their distance from the
camera.
The technology itself
is, for the most part, not new, but its application up until recently has
been fairly limited. Indeed, Geri’s Game is still one of the only
compelling demonstrations of subdivision surfaces. Nonetheless, it brought
attention to subdivision surfaces as a relatively new, up-and-coming
technique for implementing scalable geometry.
Along with Pixar’s work, quite a
few researchers are actively tackling issues in the area of subdivision
surfaces, and several Siggraph papers each year advance them academically and
put them to use in solving problems. By now, they are a fairly mature
technology, and a compelling contender among scalability solutions.
The game development community
realizes that scalable geometry techniques are an important part of
developing next-generation game engines. The spread between high-end and
low-end hardware seems to get bigger each year (thanks to current and
forthcoming geometry accelerators such as Nvidia’s GeForce 256 and S3’s Savage2000),
forcing game developers to find ways to cater to the masses that use low-end
machines while building in features that make the most of hardcore gamers’
advanced hardware. As a result, on the low end our engines should still be
capable of using fewer than 10,000 polygons per scene, but on the high end,
the sky’s the limit: even hundreds of thousands of polygons per scene can
cruise along at 60 frames per second. Scalable geometry techniques such as
subdivision surfaces are therefore necessary to accommodate this variation in
hardware capabilities.
In this article, a
number of different kinds of subdivision surfaces will be discussed. As a
preliminary warning, this article is entirely theory. Next month, we’ll look
at an example implementation of one of the schemes, the modified butterfly,
which I’ll discuss here. Keep in mind as you read this article that not every
concept described here will be practical for use in your engine. Indeed, some
subdivision surface models may not be feasible for use in games at all. But
knowing the strengths and weaknesses of the various models will help you make
the right decision for your next game.
The What and the Why
First, what is a
subdivision surface? The obvious answer is that it’s a surface generated
through subdivision. To elaborate, every subdivision surface starts with an
original polygonal surface, called a control net. Then the surface is
subdivided into additional polygons and all the vertices are moved according
to some set of rules. The rules for moving the vertices are different from
scheme to scheme, and it is these rules that determine the properties of the
surface. The rules of most schemes (including all the ones discussed here)
involve keeping the old vertices around, optionally moving them, and introducing
new vertices. There are schemes that remove the old vertices at each step,
but they’re in the definite minority.
The one thing the
control net and the eventual surface (called the limit surface) have in
common is that they are topologically the same. Topology is a way of
describing the structure of a surface that isn’t changed by an elastic
deformation, that is, a stretching or twisting. A good example and common
joke is that to a topologist, a coffee cup and a donut are identical. The
donut hole corresponds to the hole in the handle of the coffee mug. On the
other hand, a sphere and coffee mug are not topologically equivalent, since
no amount of stretching and twisting can punch a hole in that sphere.
Topology is one
reason that subdivision surfaces are worth a look. With Bézier or B-spline
patches, modeling complex surfaces amounts to trying to cover them with
pieces of rectangular cloth. It’s not easy, and often not possible if you
don’t make some of the patch edges degenerate (yielding triangular patches).
Furthermore, trying to animate that object can make continuity very
difficult, and if you’re not very careful, your model will show creases and
artifacts near patch seams.
That’s where
subdivision surfaces come in. You can make a subdivision surface out of any
arbitrary (preferably closed) mesh, which means that subdivision surfaces can
consist of arbitrary topology. On top of that, since the mesh produces a
single surface, you can animate the control net without worrying about seams
or other continuity issues.
As far as actual uses
in games, I believe that subdivision surfaces are an ideal solution for
character modeling. Environments and other parts of a game generally don’t
have the fine detail or strange topology that would require subdivision surfaces,
but characters can have joint areas that are particularly hard to model with
patches, and characters are in constant animation, which makes maintaining
continuity conditions very important.
The basics. Before we start discussing individual schemes, let’s
look at the basic characteristics of subdivision surfaces in general. This
gives us a framework for classifying and comparing the schemes as we come
across them. Most of these characteristics carry notable implications with
them, whether they are implied computational costs or implied ease-of-use
considerations, or anything else. These will usually be the criteria on which
you might choose one scheme above another.
Continuity: the holy grail. The first characteristic of a
scheme is its continuity. Schemes are referred to as having Cn
continuity, where n determines how many derivatives are continuous. So if a
surface is C0 continuous, it means that no derivatives are
continuous, that the surface itself doesn’t have open holes. If a surface is
C1 continuous, it means that the surface is closed and that its
tangents are continuous (so there aren’t any sharp seams).
This probably won’t
be a major selling point of one scheme above another, since just about every
scheme has C1 continuity everywhere. Some have C2
continuity in some places, but the majority have areas where the best they
can claim is C1. So most schemes are alike in this regard.
However, continuity
is most certainly worth mentioning because it’s one of the major reasons to
think about using subdivision surfaces in the first place. After all, Pixar
could have modeled Geri using as many polygons as they wanted, since they’re
not running their movies in real time. But no matter how many polygons they
used, you could get close enough that Geri’s skin would look faceted from the
polygons. The point of using a subdivision model is that you have that ideal
limit surface at which you can always throw more and more polygons as you get
closer and closer to, no matter how high the display resolution or how close
the model is to the screen. Only a very small portion of the real world is
flat with sharp edges. For everything else, there’s subdivision surfaces.
To Interpolate or not
to Interpolate...
While the degree of
continuity is generally the same for all subdivision schemes, there are a
number of characteristics that vary notably between schemes. One important
aspect of a scheme is whether it is an approximating scheme or an
interpolating scheme. If it’s an approximating scheme, it means that the
vertices of the control net don’t lie on the surface itself. So, at each step
of subdivision, the existing vertices in the control net are moved closer to
the limit surface. The benefit of an approximating scheme is that the
resulting surface tends to be very fair, having few undulations and ripples.
Even if the control net is of very high frequency with sharp points, the
scheme will tend to smooth it out, as the sharpest points move the furthest
onto the limit surface. On the other hand, this can be to the approximating
scheme’s detriment, too. It can be difficult to work with, as it’s harder to
envision the end result while building a control net, and it may be hard to
craft more undulating, rippling surfaces as the scheme fights to smooth them
out.
|
|
|
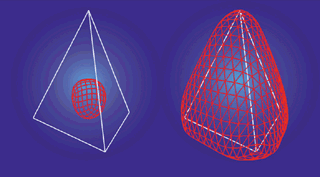
Figure 1. Two schemes subdivide a
tetrahedron. The left scheme is
approximating, and the right is interpolating.
|
If it’s an interpolating scheme,
it means that the vertices of the control net actually lie on the limit
surface. This means that at each recursive step, the existing vertices of the
control net are not moved. The benefit of this is that it can be much more
obvious from a control net what the limit surface will look like, since the
control net vertices are all on the surface. However, it can sometimes be
deceptively difficult to get an interpolating surface to look just the way
you want, as the surface can develop unsightly bulges in areas where it
strains to interpolate the vertices and still maintain its continuity.
Nonetheless, this is usually not a tremendous problem.
Figure 1 shows
examples of an approximating scheme (on the left) and an interpolating scheme
(on the right). The white outline is the control net, and the red wireframe
is the resulting surface after a few subdivision steps. You can see the
difference quite clearly: the approximating surface seems to pull away from
the net, while the interpolating surface flows through the vertices of the
net.
Surfaces in Uniform
Another set of
characteristics of a scheme brings in four more terms. A scheme can be either
uniform or nonuniform, and it can be either stationary or nonstationary.
These terms describe how the rules of the scheme are applied to the surface.
If the scheme is uniform, it means that all areas of a control net are
subdivided using the same set of rules, whereas a nonuniform scheme might
subdivide one edge one way and another edge another way. If a scheme is
stationary, it means that the same set of rules is used to subdivide the net
at each step. A nonstationary scheme, on the other hand, might first
subdivide the net one way, and then the next time around use a different set
of rules.
All the schemes we’ll
talk about here are fundamentally both uniform and stationary. There are some
extensions to these schemes that make them nonstationary or nonuniform, but
there aren’t many subdivision schemes that are fundamentally nonstationary or
nonuniform. One of the main reasons for this is that most of the mathematical
tools we have for analyzing schemes are unable to deal with dynamically
changing rules sets.
Subdivision Shape
Another
characteristic of a scheme, albeit less significant than the prior ones, is
whether it is triangular or quadrilateral. As the names would imply, a
triangular scheme operates on triangular control nets, and a quadrilateral
scheme operates on quadrilateral nets. Clearly, it would be inconvenient if
you had to restrict yourself to these primitives when building models.
Therefore, most quadrilateral schemes (including the one discussed here) have
rules for subdividing n-sided
polygons. For triangular schemes, you generally need to split the polygons
into triangles before handing them over to be subdivided. This is easy enough
to do, but one downside is that for some schemes, the way you break your
polygons into triangles can change the limit surface. The changes are usually
minor, though, so you simply need to be consistent: if you randomly choose
which diagonal of a quadrilateral to split on every frame, you’ll end up with
popping artifacts.
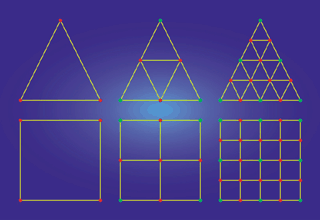
Figure 2 shows
examples of a triangular subdivision scheme as compared to a quadrilateral
scheme. Notice that the triangular scheme only adds new vertices along the
edges, whereas the quadrilateral scheme needs to add a vertex in the center
of each face. This is one reason why triangular schemes tend to be somewhat
easier to understand: their rules have that one fewer step in them.
|
|
|
Figure 2. The differences between the tessellation used by a
triangular scheme (top) and a quadrilateral scheme (bottom).
|
Extraordinary
Vertices
The preferred vertex
valence is another property of subdivision schemes. The valence of a vertex
is the number of edges coming out of it. Most every vertex a scheme produces
during subdivision has the same valence. Vertices of that valence are the
regular vertices of a scheme. Vertices of any other valence are known as
extraordinary vertices. Their effect depends on the subdivision scheme, but
historically there have been problems analyzing the limit surface near
extraordinary vertices. As we look at various schemes, we’ll see the effect
that extraordinary vertices have on each one.
Most schemes don’t
ever produce extraordinary vertices during subdivision, so the number of
extraordinary vertices is set by the original control net and never changes.
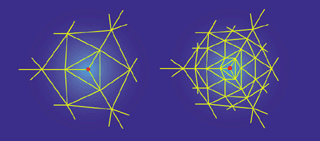
Figure 3 is an example of two steps of a triangular scheme with an
extraordinary vertex in the center. Notice how it remains the only
extraordinary vertex after a step of subdivision. Also note that the valence
of the regular vertices is 6. This is common for triangular schemes, as they
all tend to split the triangles in the same way — by adding new vertices
along the edges and breaking each triangle into four smaller triangles.
|
|
|
Figure 3. A triangular net (left) and
after one subdivision step (right). The red vertex is extraordinary.
|
Surface Evaluation
Surface evaluation is the
process of taking a control net, adding vertices, and breaking faces into
more, smaller faces to find a better polygonal approximation of the limit
surface. There are a number of ways to evaluate a subdivision surface. All
subdivision schemes can be evaluated recursively. Furthermore, most
(including all the ones discussed here) can be explicitly evaluated at the
vertex points of the control net. For interpolating schemes, this means that
you can explicitly calculate the surface normals at the vertices using what
are called tangent masks. For approximating schemes it means you can also
explicitly calculate the vertex’s limit position, using what are called
evaluation masks. In this context, a mask isn’t the same kind of mask that you
might use during binary arithmetic. Our masks are more analogous to the masks
worn at a masquerade. They are like stencil cutouts, shapes that can be
“placed” on the control net, and their shape determines which of the
surrounding vertices are taken into account (and how much effect each has) in
determining the end result, be it the vertex location or its tangent vectors.
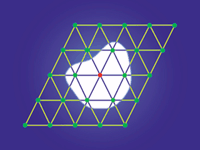
Figure 4 shows a visual example of applying a mask to a surface at a vertex.
|
|
|
Figure 4. A hypothetical mask. Here, the white region is a
mask used to dictate which vertices are used in a computation involving the
red vertex.
|
An important aspect of
evaluation is the scheme’s support. The support refers to the size of the
region considered during evaluation. A scheme is said to have compact support
if it doesn’t have to look very far from the evaluation point. Compact
support is generally desirable because it means that changes to a surface are
local — they don’t affect the surface farther away.
A Note on Notation
Since the original
authors of many subdivision schemes weren’t operating in concert with one
another, the notation used between schemes tends to vary fairly wildly. Here,
I’ve tried to stick with a fairly consistent notation. When talking about a
specific vertex, it is v. If it
matters what level of recursion it’s at, that level i is indicated as a superscript, so the vertex is vi. The vertex’s valence is
N. The neighboring vertices of the
vertex are ej where j is in the range [0,N–1]. Again, if the level of recursion
matters, that level i is a
superscript, so eij
is the jth edge vertex at level i. I try to use this notation
everywhere, but there are a few places where it’s much clearer to use a
different notation.
The one problem with
a standard notation is that if you access some of the references at the end
of this article, they will very likely use their own, different notation. As
long as the concepts make sense, though, it shouldn’t be difficult to figure
out someone else’s naming convention.
The Polyhedral Scheme
The polyhedral scheme
is about the simplest subdivision scheme of all, which makes it a good
didactic tool but not the kind of scheme you’d ever actually want to use.
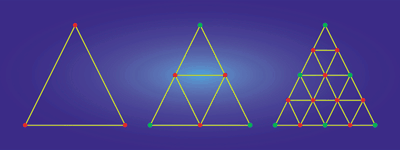
It’s a triangular scheme where you subdivide by adding new vertices along the
midpoints of each edge, and then break each existing triangle into four
triangles using the new edge vertices. A simple example is shown in Figure 5.
The problem with this, of course, is that it doesn’t produce smooth surfaces.
It doesn’t even change the shape of the control net at all. But it serves to
demonstrate some concepts fairly well.
|
|
|
Figure 5. Two steps of subdividing a
triangle with the polyhedral scheme.
|
The scheme is clearly
interpolating since it doesn’t move the vertices once they’re created. It’s
also triangular, since it operates on a triangular mesh. Furthermore, the
scheme is uniform since the edge’s location doesn’t affect the rules used to
subdivide it, and stationary since the same midpoint subdivision is used over
and over. The surface is only C0 continuous, since along the edges of
polygons it doesn’t have a well-defined tangent plane. The regular vertices
of this scheme are of valence 6, as that’s the valence of new vertices
created by the scheme. However, this scheme is simple enough that it doesn’t
suffer because of its extraordinary vertices.
The evaluation of the scheme
isn’t hard at all. You can evaluate it recursively using the subdivision
rules. As far as evaluation and tangent masks go, it’s clear that we don’t
need an evaluation mask, since the points are already on the limit surface.
Tangent masks don’t really make any sense, since our surface isn’t smooth and
therefore doesn’t have well-defined tangents everywhere.
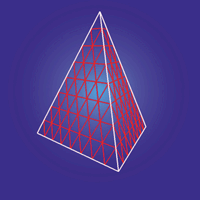
Figure 6 shows a
tetrahedron control net in white with a red wireframe of the surface after a
few subdivision steps of the polyhedral scheme.
|
|
|
Figure 6. A tetrahedron
control net (in white) and
a polygonal surface approximation (in red) produced using the
polyhedral scheme.
|
Float Like a
Butterfly...
The next scheme is
known as the butterfly subdivision scheme, or, in its current form, the
modified butterfly scheme. It shares some similarities with the polyhedral
scheme, but has some differences, notably that it’s C1 continuous
and therefore actually produces a smooth surface.
|
|
|
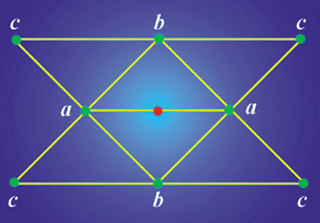
Figure 7. The
8-point stencil for the
original butterfly scheme.
|
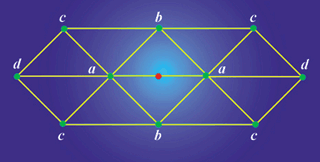
The butterfly scheme
has a fairly interesting history to it. In 1990, Dyn, Levin, and Gregory
published a paper titled “A Butterfly Subdivision Scheme for Surface
Interpolation with Tension Control” (see For Further Info at the end of this
article). It described the first butterfly scheme. The title is derived from
the stencil, or map of neighbors used during evaluation, which is shaped like
a butterfly (Figure 7). The scheme is interpolating and triangular, so all it
ever does is add vertices along the edges of existing triangles. The rules
for adding those vertices are simple, and the support is compact. For each
edge, sum up the vertices in the stencil-shaped area around that edge,
weighting each one by a predetermined weight. The result is the new vertex.
The weights used, corresponding to the vertex labelings in Figure 7, are
these:

In this case, w is a tension parameter, which
controls how “tightly” the limit surface is pulled towards the control net —
note that if w equals –1/16, the scheme
simply linearly interpolates the endpoints and the surface isn’t smooth.
One question that the
scheme doesn’t answer, though, is what to do if the area around an edge
doesn’t look like that butterfly stencil. Specifically, if either of the
edges’ endpoints is of a valence less than 5, there isn’t sufficient
information to use the scheme, leaving you with no choice but to choose w = –1/16 near that area, resulting in
a surface that isn’t smooth near those extraordinary points. This means that
while the surface is smooth almost everywhere, there will be isolated jagged
points that really stand out visually and make the surface harder for an
artist to craft.
|
|
|
Figure 8. The
10-point stencil from the
modified butterfly scheme.
|
In 1993, Dyn and his
colleagues extended the butterfly scheme to use a ten-point stencil, so that
the default case was the one shown in Figure 8, similar to the eight-point
case with the rear vertices added in. The new weights are:

Note that by adding w to the d
points and subtracting it from the a points, the stencil’s total weighting
still adds up to 1. Intuitively, this is important because it means that the
new point will be in the neighborhood of the ones used to generate it. If the
weights summed to, say, 2, then the point would be twice as far from the
origin as the points used to generate it, which would be undesirable.
|
|
|
Figure 9. The stencil for an extraordinary
vertex in the modified butterfly scheme.
|
This new scheme even reduces to
the old scheme as a subset — choosing w
= 0 results in the same rule set as the eight-point butterfly stencil.
However, this extension didn’t address the smoothness problem at
extraordinary vertices.
In 1996, Zorin,
Schröder, and Sweldens published an extension of the butterfly scheme known
as the modified butterfly scheme. The primary intent of their extension was
to develop rules to use for extraordinary vertices, making the surface C1
continuous everywhere.
If both of the endpoints of the
edge are regular valence-6 vertices, the scheme uses the standard butterfly’s
ten-point stencil with the same weights.
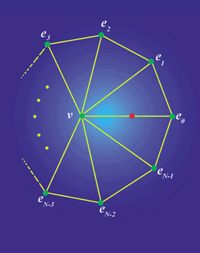
If only one of the endpoints is
extraordinary, the new vertex is computed by the weighted sum of the extraordinary
vertex and its neighbors (see the stencil in Figure 9). Note that you
actually do not consider some of the neighbors of the regular vertex in doing
this, which might seem a little odd. Given the extraordinary vertex’s valence
of N, the weights used are:
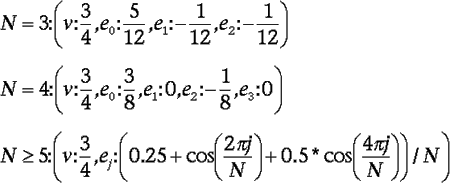
The full justification for these
weights is available in Zorin’s thesis (see For Further Info at the end of
this aritcle).
If both endpoints of the
edge are extraordinary, the vertex is computed by averaging the results
produced by each of the endpoints. So, evaluate the vertex once for each
endpoint using the appropriate weights from above, and average the resulting
two candidates.
Those, then, are the rules for
recursively evaluating the surface. Since the scheme is interpolating, you
don’t need an evaluation mask, but it would be nice to have a tangent mask to
explicitly find the tangents at vertices. Such a mask exists, although it’s
fairly lengthy to write out, and not particularly enlightening. It can be
found in Zorin’s thesis, and I’ll discuss it next month when implementing
this scheme.
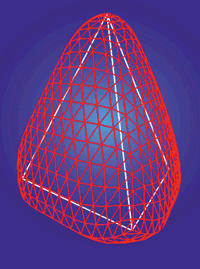
Figure 10 shows a
tetrahedron control net in white with a red wireframe of the surface after a
few subdivision steps of the modified butterfly scheme.
|
|
|
Figure 10. A tetrahedron control net (in white) and a
polygonal surface approximation (in red) produced using the modified
butterfly scheme.
|
Catmull-Clark
Surfaces
The final scheme we’ll examine
has some significant differences from the modified butterfly. Notably, it’s
quadrilateral and it’s approximating, and so presents some new challenges.
Its regular vertices are of valence 4, since a regular quadrilateral surface
is a rectangular grid with vertices of valence 4.
Because this scheme is
quadrilateral, it has to deal with things like placing vertices in the
centers of polygons, and the rules are generally a bit more complex. Vertex
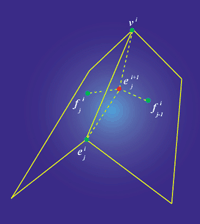
addition is done in three steps. For each face in the old control net, add a
vertex in its center, where the center is found by averaging its vertices.
Then, for each edge in the old control net, a new vertex is added equal to
the average of the edge’s endpoints and the new adjacent face points (see
Figure 11 for an illustration).
|
|
|
Figure 11. Calculation of a
new edge vertex in a
Catmull-Clark surface. The
new edge vertex is the average of the four points.
|
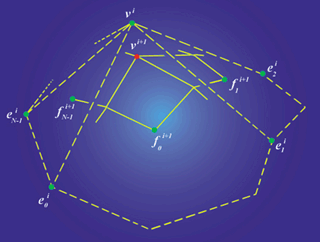
Finally, move the original
vertices of the old control net using neighboring points in the calculation.
The stencil is shown in Figure 12; the rules are as follows:

|
|
|
Figure 12. The points used to calculate the new position of a
vertex in a Catmull-Clark surface. The points used are in green; the new
vertex location is in red.
|
New edges are then formed by
connecting each new face point to its adjacent new edge points and connecting
each new vertex point to its adjacent new edge points. This defines the faces
as well, and it brings up an interesting point: consider what happens when
you subdivide a surface with a polygon that is not a quadrilateral. The
resulting new face vertex will be connected to k new edge vertices, and k
will not be equal to four. Therefore, the new face vertex is an extraordinary
vertex. This is the only one of the three schemes shown here where the scheme
can actually create an extraordinary vertex during subdivision.
This is not as bad as it may
seem, though. After a single subdivision step, all the faces in the control
net are quadrilaterals. Therefore, the scheme can only introduce new
extraordinary vertices during the first subdivision step. After a single
subdivision step, the number of extraordinary vertices is set and will not
change.
The scheme also has
evaluation and tangent masks for evaluation at the vertices. The full
discussion and proof of the evaluation mask can be found in Halstead et al.
and is fairly lengthy. The mask itself is fairly simple, though. For a vertex
of valence N, the mask is equal to:
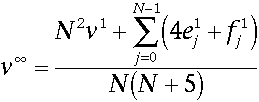
It’s interesting to note that
this mask requires that we’ve subdivided the net once, since it uses the face
and edge vertices of the same level as the corner vertices, and face and edge
vertices are not available in the original control net.
The tangent masks
carry an equally lengthy discussion, but their resulting formula is also
fairly complicated. Because most of it can be precomputed for each valence
and stored in a lookup table, it’s not computationally expensive, it’s just a
large formula:

The surface normal is then the
normalized cross product of t0 and t1.
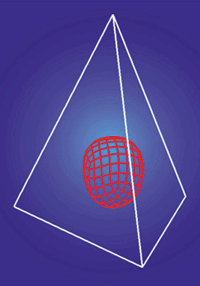
Figure 13 shows a tetrahedron
control net in white with a red wireframe of the surface after a few
subdivision steps of the Catmull-Clark scheme.
|
|
|
Figure 13. A tetrahedron control net (in
white) and a polygonal surface approximation (in red) produced using the
Catmull-Clark scheme.
|
Catmull-Clark Extended
Catmull-Clark surfaces hold the
distinction of being the favored surfaces for use in high-end rendering; they
were the model employed by Pixar in Geri’s Game. Their mathematical elegance
and the amount of work devoted to them make them a fairly attractive choice.
For instance, work has been done on generating Catmull-Clark surfaces that
interpolate a set of points, which, as an approximating scheme, they do not
usually do. Furthermore, Pixar extended them for Geri’s Game to allow for
sharp and semi-sharp creases in the surface.
Pixar’s scheme
generating these creases is fairly straightforward. It allows an artist to
specify for an edge or vertex that subdivision near that edge or vertex
should be done sharply (using polyhedral subdivision) for some number of
steps, from 0 to infinity. Intuitively, the more sharp steps that are used,
the more creased the surface will appear near that edge. If the number is
finite, then the surface will still be smooth, since eventually the surface
will resume using the normal Catmull-Clark subdivision rules. If the crease
is infinitely sharp, it isn’t smooth at all. Pixar put these to use on Geri’s
skin features, adding creases to various locations across his body like
between his skin and fingernails.
It’s worth noting
that while this greatly extends the application of the surfaces, it changes
the properties of the scheme. The scheme becomes both nonuniform, since
different edges and vertices can be of differing degrees of sharpness, and
nonstationary, because a semi-sharp crease is evaluated linearly for some
number of steps and then smoothly for the rest. Near the creases, the surface
no longer reduces to the B-spline surface, and it also invalidates the
evaluation and tangent masks.
Geri’s Game clearly demonstrates the
benefit of sharp and semi-sharp creases. However, for use in games, the
evaluation and tangent masks are fairly important, and so it’s difficult to
say whether the increased computational cost is worth the added
functionality.
Are You Dizzy Yet?
After this whirlwind
tour of subdivision surfaces, you might be feeling a little light-headed or
dizzy. Hopefully though, you’ve picked up the concepts behind subdivision
surfaces and maybe even thought of some good applications for them in
projects you’re working on or getting ready to start. Since there’s nowhere
near enough space to discuss implementation details for even just these three
schemes, next month we’ll bear down and focus on one of them, the modified
butterfly scheme. I’ll mention the reasons I think it’s a good choice for use
in games, discuss some of the benefits and detriments, and then present an
example implementation.
Until then, there’s
certainly no dearth of information on subdivision surfaces. Much of it is
available online. The ACM Digital Library is an excellent resource for this
topic as much of the work in subdivision surfaces has been published in the
recent Siggraph conferences. Furthermore, many of the papers, Siggraph or
not, are available directly from authors’ web sites.
Acknowledgements
Thanks to Pixar for graciously
allowing us to use images from their short animation, Geri’s Game.
Thanks also to Denis Zorin for his suggestions and references, Jos Stam at
Alias|Wavefront for his help and suggestions, and to Alias|Wavefront for
allowing him to release his precomputed eigenstructures. Thanks to Chris
Goodman of 3dfx for discussions, latté, and those hard-to-find papers, and to
Adrian Perez of Carnegie-Mellon University for suggesting the subdivision
scheme I eventually settled on.
For Further Info
• Catmull, E., and J. Clark.
“Recursively Generated B-Spline Surfaces on Arbitrary Topological Meshes.” Computer
Aided Design, 1978.
• DeRose, T., M.
Kass, and T. Truong. “Subdivision Surfaces in Character Animation.” Siggraph
‘98. pp. 85–94.
• Dyn, N., J. A.
Gregory, and D. A. Levin. “Butterfly Subdivision Scheme for Surface
Interpolation with Tension Control.” ACM Transactions on Graphics.
Vol. 9, No. 2 (April 1990): pp. 160–169.
• Dyn, N., S. Hed,
and D. Levin. “Subdivision Schemes for Surface Interpolation.” Workshop in
Computational Geometry (1993), A. C. et al., Ed.,” World Scientific,
pp. 97–118.
• Halstead, M., M.
Kass, and T. DeRose. “Efficient, Fair Interpolation Using Catmull-Clark
Surfaces.” Siggraph ‘93. p. 35.
• Stollnitz, E., T. DeRose,
and D. Salesin. Wavelets for Computer Graphics. San Francisco:
Morgan-Kaufman, 1996.
• Zorin, D.
“Stationary Subdivision and Multiresolution Surface Representations.” Ph.D.
diss., California Institute of Technology, 1997. (Available at ftp://ftp.cs.caltech.edu/tr/cs-tr-97-32.ps.Z)
• Zorin, D., P.
Schröder, and W. Sweldens. “Interpolating Subdivision for Meshes with
Arbitrary Topology.” Siggraph ‘96. pp. 189–192.
ACM Digital Library
http://www.acm.org/dl
Joe Stam’s web site
http://reality.sgi.com/jstam_sea/index.html
Denis Zorin’s web
site
http://www.mrl.nyu.edu/dzorin
Charles Loop’s web
site
http://research.microsoft.com/~cloop
Siggraph ‘99
Subdivision Course Details, Notes, Slides
http://www.mrl.nyu.edu/dzorin/sig99
Geometric Modeling
http://muldoon.cipic.ucdavis.edu/CAGDNotes
When he's not sleeping through
meetings or plotting to take over the world, Brian's busy furtively
subdividing, hoping one day to develop his own well-defined tangent plane.
Critique his continuity at bsharp@acm.org.
|
