In this assignment, we had to experiment with procedural shading. I initially wanted to do something with hardware rendering, but I had never really written a shader before so I decided to start off with RenderMan and BMRT.
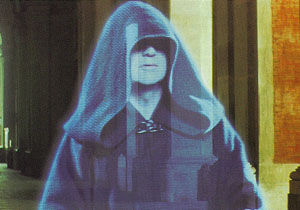
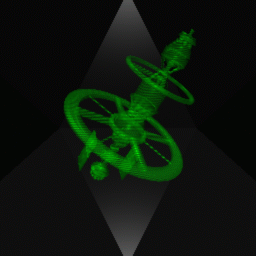
I wanted to try creating a shader that would turn objects into holographic projections similar to those seen in the Star Wars series of movies. I wasn't quite able to get the results I originally wanted to. A shader is probably not the best technique to use for this effect as it seems to be better-suited for post-processing, but it was fun to make anyway. I basically started off by trying to mimic the look that the Star Wars holograms have:
There are three main aspects to this image that I wanted to emulate in my shader:
In an attempt to achieve these effects, my shader goes through a few distinct stages. I'll discuss each of these in turn.
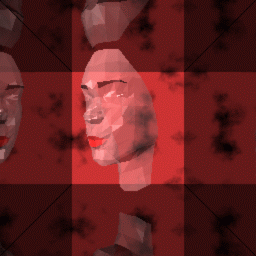
The first step was to illuminate the model. I did this simply using the standard Phong (plastic-style) illumination, but this could probably be extended to use different illumination models. However, we're already running into problems. I did the illumination using the environment and lights present wherever the viewer can see the holographic projection. Ideally, you would want to illuminate the model using the environment where the model actually resides and is being projected from. For simplicity, I did not handle this. Here is what one scene looks like after this stage:
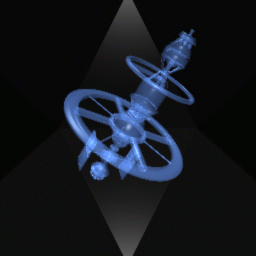
Note that the space station is somewhat transparent. I'll get to this later in the section on transparency.
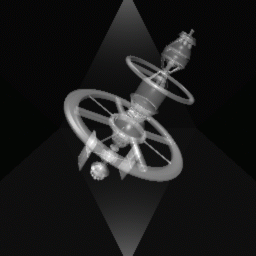
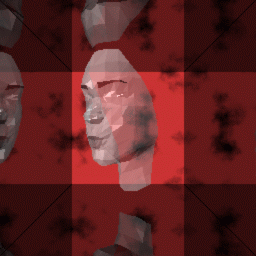
Once the object has been illuminated, we need to convert the resulting colors to the set of colors we want to use for our holographic projection. This is done in two steps: conversion to greyscale, and "tinting."
I converted to greyscale using the following formula:
Y = 0.3R + 0.59G + 0.11BI obtained this formula from GIMP-Savvy. The reason for the weights is that the eye is most sensitive to green, then red, and finally blue. After conversion to greyscale, our image looks like this:
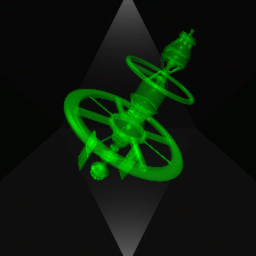
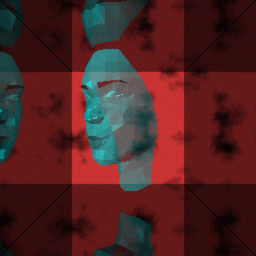
Once we have everything in greyscale, we have to tint the colors to fit into our view of what a hologram should look like. I did this simply by multiplying the holographic color that we want by the greyscale value Y we obtained above. With tinting, here is our image (I used a greenish color here instead of the standard bluish color in Star Wars, but this can be set as a parameter to the shader):
There are probably better ways to do these conversions, but these techniques seemed easy enough and yielded decent results.
I did the scanline effect using a filtered pulsetrain
presented in [1]. The pulsetrain is basically a repeating
pulse signal, created by using the mod function.
I multiplied the tinted image by the pulsetrain function
to get the following result:
The halo effect is something that was not really possible (as far as I could tell) by just using the RenderMan Shading Language directly. The reason for this is that the halo extends outside the region where the actual geometry exists (you can see this in the Star Wars image at the top of this page). You don't have access to adjacent pixels in the RenderMan Shading Language.
I decided that I would try to approximate the halo effect by using some of the cartoon rendering techniques presented in [1]. I only used the most basic technique of finding silhouette edges - determine if the dot product between the normal and the incident ray is within some threshold of 0. I did not do any filtering here. This simple technique has many problems that are also addressed in [1], but for my purposes this was fine.
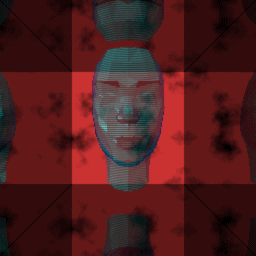
Once I determine where the edges are, I mix a halo color with the color of the existing image (and also interpolate to make a smoother transition). I also used a standard fBm function to make the halo a little noisy. In this example, I made the halo a bluish color so that it can easily be seen, but this color can be set as a parameter to the shader.
Finally, I set the opacity of the object to the user-specified opacity for the holographic projection. After the halo and transparency are taken care of, we have our final image:

There are several issues with this shader. First of all, my images don't really look all that much like the holographic projections in Star Wars. All the basic elements seem to be in place, and with some tweaking and a better scene model, maybe it might look convincing. Nevertheless, these kinds of effects seem to be easier to achieve using image processing techniques after rendering has been completed.
Edge detection for the halo effect and transparency issues can be solved by doing multiple render stages. Note that the space station images above show the entire space station to be transparent. However, the hologram should be a transparent projection of a solid object, not a transparent projection of a transparent object. There may be a way to get around this without a prerender step, but I haven't looked into that yet.
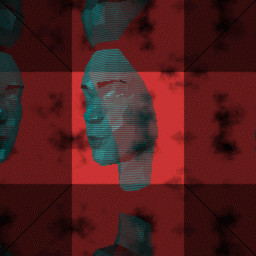
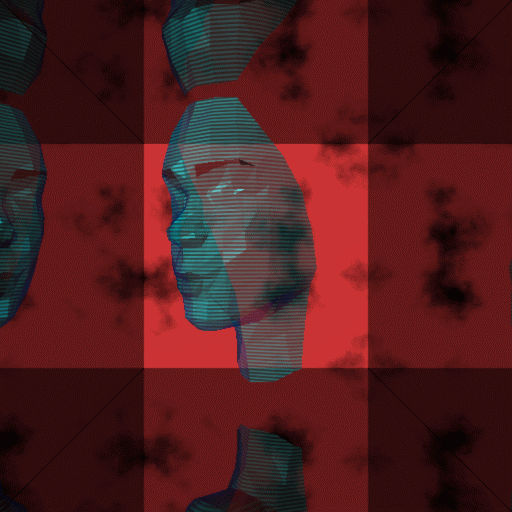
Here is another stage-by-stage example, as well as a couple of animations.
| Illumination | Conversion to greyscale |
 |
 |
| Conversion to "holoscale" | Scanlines |
 |
 |
Final image with halo:
The space station model was created by Steve Worley. The face model was created by Somhairle Foley. The cloudy procedural texture shader in the background of the face animation was written by Ken Musgrave. Some noise functions I used are from RManNotes.
The main shader code is here: swholo.sl
I also wrote a really simple mirror shader for the face animation: mirror.sl
[1] Anthony A. Apodaca and Larry Gritz. Advanced RenderMan: Creating CGI for Motion Pictures, Morgan Kaufmann Publishers, 2000.
[2] David S. Ebert, et al. Texturing and Modelling: A Procedural Approach, Academic Press, 1994.