Virtual Worlds Assignment 4: Interaction
In
this assignment, we were to create a virtual environment that
allows the user to interact with it in some way. I have been
interested in creating interfaces which are not cumbersome to the
user, yet still provide significant functionality. I used this
assignment as an opportunity to explore some future directions
described in my
Haptic Hand work. In that work, I created a widget-based
user interface panel that used the non-dominant hand itself (as
opposed to a physical prop (such as a tablet or paddle) held in
the non-dominant hand) to provide haptic feedback. The
motivation behind creating such an interface was that carrying
a physical prop can be tiresome, and when carrying a prop, the
non-dominant hand can no longer be used for other interactions
with the environment. Nevertheless, because different people have
different hand shapes and sizes, tracking the non-dominant hand
can be difficult. The idea behind this assignment was to combine
the Haptic Hand idea with prop-based interaction. Tracking
is kept simple by using a rigid paddle, and cumber is reduced
by mounting the paddle on the forearm. Forearm interfaces are
used in many applications, and in fact we often use an iPaq
attached to the forearm when running user studies, but as far
as I know, a forearm interface has not been implemented in a
virtual environment. Eventually, I would like to explore the idea
of presenting an interface on the forearm without using a physical
prop at all.
I created a simple physical prop out of cardboard (Figure 1).
A virtual interface panel (Figure 2) is displayed in the virtual
environment in a pose such that it is registered with the physical
cardboard.

Figure 1: The cardboard to which the virtual widget panel is
registered. This cardboard is mounted on the forearm using
Velcro and provides haptic feedback to the user's dominant
index finger during interaction. It is tracked using a single
Polhemus Fastrak sensor mounted in the corner, also using Velcro.
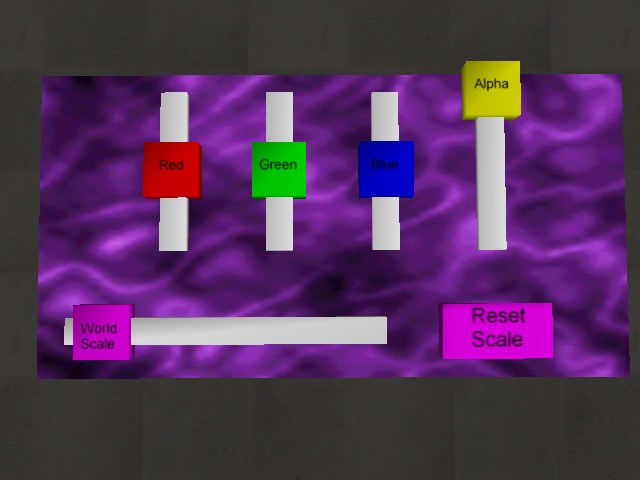
Figure 2: The virtual interface panel.
The Panel and Widgets
Currently, my system supports two kinds of widgets: buttons
and sliders. Much of this code was adapted from my Haptic Hand
work but was modified to make it much more general. The panel
and widgets are fairly configurable. The system supports using
arbitrary models, so you can plug in uniquely-shaped models for
the panel, etc. You can also specify certain parameters for
each type of widget. Below is an excerpt from a panel configuration
file:
[Panel]
Model = ./Models/UI/ForearmPanel.WMOF
Image = ./Models/UI/gas.wmif

[Widget.ResetButton]
Type = button

Model = ./Models/UI/button.WMOF
Translate = 0.06, -0.04, 0.0
Displacement = 0.0, 0.0, -0.005

InactiveImage = ./Models/UI/resetscale_inact.wmif
ActiveImage = ./Models/UI/resetscale_act.wmif
CollidingImage = ./Models/UI/resetscale_coll.wmif

[Widget.RedSlider]
type = slider

InactiveImage = ./Models/UI/red_inact.wmif
ActiveImage = ./Models/UI/red_act.wmif
CollidingImage = ./Models/UI/red_coll.wmif

Translate = -0.06, 0.02, 0.0

SliderModel = ./Models/UI/slider.WMOF
TrackModel = ./Models/UI/sliderTrackVertical.WMOF

MinPos = 0.0, -0.03, 0.0
MaxPos = 0.0, 0.03, 0.0
MinVal = 0
MaxVal = 100
For both buttons and sliders, you can specify an InactiveImage,
ActiveImage, and CollidingImage, which are the
texture images used when the widget is inactive, active, and colliding with
the dominant index finger (or whatever else the programmer has specified
as collideable with the widget), respectively. You can also specify
a translation for each widget -- this positions the widget relative to the
model-space origin of the panel model. I did not want to spend the immense
effort required in creating a layout manager, but this technique allowed me
to create custom panels fairly quickly. Buttons also let you specify a
displacement value, which determines how far the button will move when you
press it. Sliders, on the other hand, allow you to specify minimum and
maximum valid sliding positions, as well as minimum and maximum values.
Interacting with the panel
Interacting with the interface panel is relatively straightforward. The
user must simply bring their dominant index finger in contact with the
forearm interface. In particular, when the index finger intersects
with a widget, the widget is manipulated. Collision detection is done
using PQP. By doing some
calibration, the virtual panel and the physical cardboard prop are registered
such that touching the virtual panel results in touching the physical cardboard.
Unfortunately, because the physical configuration of the Polhemus Fastrak
trackers has changed (other students in the class also needed the trackers),
I was unable to get a picture of someone interacting with the system for
this writeup.
Calibration
To register the virtual panel to the physical cardboard, some
calibration was required. This was done by measuring the transform
between the Polhemus Fastrak tracker attached to the cardboard and
the upper left corner of the cardboard (the origin -- also used as
the origin for the virtual panel model). In addition, a tracker was
mounted on the dominant hand's index finger, 2cm away from the fingertip.
When I initially demonstrated this system, there was a minor problem
with the calibration transforms that allowed the user to manipulate
widgets without actually touching the surface of the cardboard. I have
since corrected this issue, but I have not had a chance to demonstrate
the system again.
The Application
This assignment was initially going to be the beginning of my
original final project idea,
but my final project has since changed. As such, the application for this
assignment was not very far along, as I concentrated mostly on getting
the interface itself working. The current interface panel has five
sliders and one button on it (see Figure 2). Four of the sliders are
used to adjust parameters of a virtual knot floating above a pedestal
in front of the user in the virtual environment (Figure 3). The "Red,"
"Blue," and "Green" sliders adjusted the red, blue, and green color components
of the knot. The "Alpha" slider adjusted the knot's transparency level.

Figure 3: A knot floating above a pedestal in the environment. The color
and transparency of this knot were adjustable via the forearm panel interface.
The fifth slider ("World Scale") was used to adjust the scale of the world around the
user. In my original final project idea, I was planning on using sliders
to move back and forth through time in a physical simulation, as well as
to adjust the size of the world to allow users to explore the world at
different scales. The world scaling works, but since I have not yet
implemented the ability to carry the Polhemus Fastrak tracking system
around with the user, exploration of the world is limited to a very
local area. The size of the panel and hand must, of course, remain
the same for the user to interact with the panel. Figure 4 shows the
pedestal towering over the user when the environment has been scaled to
be much larger. The "Reset Scale" button was used to reset
the world's scale back to 1.0.

Figure 4: A pedestal towering over the user when the world has been
scaled to be much larger.
Code...
...is available here! You need
the Eveil and Wild Magic 3.2 libraries to build it.