Description
In this program, you will write a one-sided Battleship game; in particular, the computer will secretly place five ships on a 10x10 grid at random, and the user will try to find and destroy all of the computer's ships by clicking on a grid to attack the ships.
You will write the code that randomly places the ships on the grid, and you will also write the code that enables the user to attack the computer's ships. I have given you skeleton code to start with, and you will have to fill in the functionality where required.
This is a very hard program and I recommend starting simple and then adding more complicated features. Read this assignment thoroughly. Don't get overwhelmed -- it looks more complicated than it actually is. Just go through each part of the assignment step by step. Make sure each part works before moving on to the next part.
START EARLY!
START EARLY!
START EARLY!
Part 1: Starting simple, initializing and printing the grid
Files needed
BattleshipGrid.java
BattleshipDriver.java
Download the files above. The BattleshipGrid class represents
the computer's grid that will contain ships. You will be writing much of the code for
this class. BattleshipDriver is a driver program that will let
you test your BattleshipGrid class. The driver program simply
creates a new instance of the BattleshipGrid class and calls a
method to print the grid. Try compiling both files. It will not compile
right now because you have not filled any code in yet. Take a look at
BattleshipGrid.java. Do not be intimidated by its size;
it is not as complicated as it might look. The code starts off by defining
several constants. It then declares some instance variables and finally
has a constructor and a few methods.
As usual, look for comments that begin with ::: to find code
that you will have to add or modify.
The first thing you have to do to get your code to compile is declare a 2D integer array instance variable named grid where indicated in the code.
Try compiling your code now. It should run, but it will still not do anything. Next steps:
Fill in the initializeGrid method. This method sets all of
the elements of the grid to EMPTY (EMPTY is a constant defined
at the top of the class). You will need a nested loop.
See p. 467 (4th edition) or p. 501 (5th edition) for how to process a 2D array.
Fill in the printGrid method. See p. 471 (4th edition) or
p. 504 (5th edition).
If you compile and run the program now, you should see this output, a
10x10 2D grid of all zeroes:
0 0 0 0 0 0 0 0 0 0
0 0 0 0 0 0 0 0 0 0
0 0 0 0 0 0 0 0 0 0
0 0 0 0 0 0 0 0 0 0
0 0 0 0 0 0 0 0 0 0
0 0 0 0 0 0 0 0 0 0
0 0 0 0 0 0 0 0 0 0
0 0 0 0 0 0 0 0 0 0
0 0 0 0 0 0 0 0 0 0
0 0 0 0 0 0 0 0 0 0
Part 2: Randomly placing ships on the grid
This is the hardest part of the program, so think through your algorithm
on paper before writing any code. The goal of this part is to randomly place
the computer's ships on the grid. We will do this by putting values other
than EMPTY in the grid. In particular, we want to put the value SHIP (constant
defined at the top of the class) in each grid cell where there is a ship.
There are 5 kinds of ships, and they have different lengths (also defined as constants at the top of the class):
You will need to randomly place these 5 ships on the grid by filling in
the placeAllShips method. This method is already called for you
by the constructor. After your placeAllShips method works, the
driver program should have output similar to this (it will look different
each time you run your program):
0 1 0 0 0 0 0 1 0 0
0 1 0 0 0 0 0 1 0 0
0 1 0 0 0 0 0 1 0 0
0 0 0 0 0 0 0 1 0 0
0 0 1 1 1 1 0 1 0 0
0 0 0 0 0 0 0 0 0 0
1 0 0 0 0 0 0 0 0 0
1 0 0 0 0 0 0 0 0 0
1 0 0 0 0 0 0 0 1 1
0 0 0 0 0 0 0 0 0 0
Notice that there are 5 ships (one of each type specified above) in this grid, represented by the 1s.
Use top-down design to figure out your algorithm for placing your ships. At the high level, you are trying to place 5 ships on the board. How do you place 5 ships? Place one of them at a time. How do you place one ship?
You need to choose a random row and column for each ship to start at, as well as a random direction (DIRECTION_RIGHT or DIRECTION_DOWN) for the ship on the grid. You also need to make sure that the ship will fit before you place a ship it on the grid.
A ship will not fit under two conditions:
You will need to divide your tasks into subtasks. I recommend using your subtasks to guide you in making helper methods that will perform these subtasks.
I have given you a method inBounds
that determines if a particular row and column pair is in bounds. I have also given you
a getCell method that will get the value of the cell at the specified
row and column. It will return the constant OUT_OF_BOUNDS if the
row and column pair is out of bounds. I suggest using these methods in your code.
For convenience, all of the ship lengths have been placed in an array named SHIP_LENGTHS.
You can iterate over this array to add each of the ships to the grid.
Random numbers
You can use the Random class to give you random integers. Here is how:
Random rnd = new Random();

// get a random number between 0 and 49 inclusive
int randomNumber = rnd.nextInt(50);
You can pass any integer x to the nextInt method and you will get a random number
between 0 and x - 1 inclusive.
You will have to choose a random row, a random column, and a random direction (there
are only two options, so you will have to use rnd.nextInt(2) for this -- also note that
there are two defined constants, DIRECTION_RIGHT, 0,
and DIRECTION_DOWN, 1, that you can use in your methods).
Note that you can also use the printGrid method to print out your grid
to test intermediate steps in your program (for example, print the grid each time you
add a single ship). Make sure to take out these testing printGrid calls when you
are sure your code works.
Part 3: Attacking the computer's ships
Now that the computer can randomly place ships on the grid, we need a way to attack the computer's ships. I have given you two methods that you have to fill in:
public boolean attack(int row, int col)
public boolean allDestroyed()
Read the comments in the code to see what these methods are supposed to do,
and fill in the code appropriately. You can test your code by changing
BattleshipDriver.java. For example, you could test your attacks
by doing something like this:
game.attack(3, 7);
game.printGrid();
game.attack(2, 2);
game.printGrid();
and so on. You can do similar tests with the allDestroyed method.
Part 4: Mouse clicking
Additional files needed
Battleship.java
HitMissPanel.java
BattleshipPanel.java
You will no longer be using BattleshipDriver.java as your main program.
Download the above files, and compile them. Battleship is now your
main program. You will not have to change Battleship.java or
HitMissPanel.java at all. Compile and run Battleship.java.
You should get a window that looks like this (but a little larger):
![]()
In BattleshipPanel.java, you have been given code that gets
mouse clicks from the user. When the user clicks the mouse, the
attackGrid and grid.allDestroyed() methods are
called for you. You have to fill in the attackGrid method.
This method takes two parameters, the x and y position of the mouse click.
These parameters will vary from 0 to 600. The board is 601x601, with (0, 0)
in the upper left corner:
You can think of the board as a visual array with each cell being 60x60 in size.
Inside attackGrid, you need to determine which cell the user has selected,
and attack that cell (using your attack method from Part 3)
on the computer's grid (notice that there is an instance variable
named grid in BattleshipPanel.java, and it is already set
up for you to use -- you do not need to make a new instance). You will need to convert the location
of the mouse click to the grid's array indices. For example, if the user clicked at
mouse location (90, 105), this would correspond to row 1, column 1. If the user
clicked at mouse location (210, 30), this would correspond to row 0, column 3.
There is a very easy way to do this without using if statements
or switch statements. Note that you have access to the following
constants:
PANEL_WIDTH, PANEL_HEIGHT: width and height in pixels of the board (these are both 601)grid.NUM_ROWS, grid.NUM_COLS: number of rows and columns in the grid (these are both 10)The attackGrid method also updates hit and miss statistics, so
make sure you update the numHits and numMisses variables
appropriately. Again, you can use grid.printGrid() to make sure your
grid is being updated correctly.
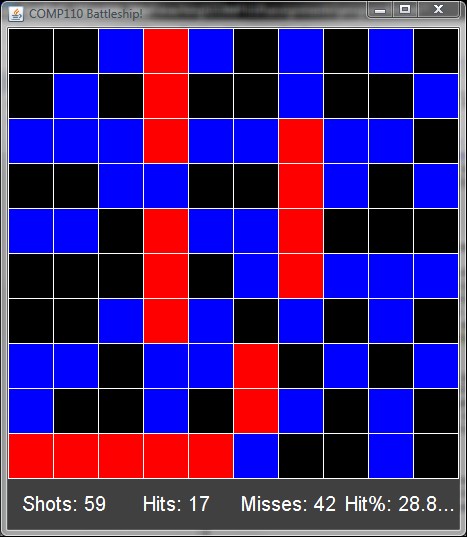
Part 5: Whew, the last part: game display
Now that you can attack grid cells, the last part to take care of is displaying
your hits and misses on the screen. To do this, you will fill out the drawGridCells
method in BattleshipPanel.java. I have given you code that iterates
over all the cells of the grid. You will have to fill the body of the inner loop
to draw a black rectangle for empty cells, a blue rectangle for misses, and a red
rectangle for hits. You can determine the location of your shape by multiplying
and adding your current row and column by appropriately calculated numbers.
Look at the
Java Graphics class to figure out how to draw a rectangle.
A finished run might look like this (but a little larger):
Additional questions
How to turn in the assignment
yourlastname_prg4.jar containing your
Battleship.java, BattleshipDriver.java,
BattleshipGrid.java, BattleshipPanel.java, and
HitMissPanel.java
Java source code. (Include Battleship.java and HitMissPanel.java
even though they were not changed.)COMP110 Program4 yourlastname
with the following attachments:
yourlastname_prg4.jar (where yourlastname is your last name),
which includes your source filesyourlastname_prg4.txt (or .doc), which contains your answers to the
additional questionsPrint a copy of your code (only BattleshipGrid.java,
and BattleshipPanel.java.
BattleshipDriver.javaBattleshipDriver.java
is no longer required as a printout -- don't worry about it if you have already printed it, you
can still hand it in if you'd like)
and hand it in at the beginning of class on the due date.
Please let me know if you are having any problems with the assignment submission process.
EARLY CODE CHECK
I want to make sure you are working on this code early on so you don't get swamped at the very end. Therefore, by 11:59pm on Wednesday, November 19:
yourlastname_earlyprg4.jar containing only your
BattleshipGrid.java Java source code.
COMP110 EarlyProgram4 yourlastname
with the following attachment:
yourlastname_earlyprg4.jar (where yourlastname is your last name).
Your code does not have to be completed by this time, but I want to see that you are making
progress. I will give you some feedback by Friday, November 21. This early code
check will be worth 15 points out of this assignment's total score. It will not
be accepted late; just turn in whatever you have so far.
Grading
You can also lose points for incorrectly handing in the assignment, missing pledge headers,
not turning in your printed code, not using appropriate white space, not using conventional names
for any variables or methods you declare, and not commenting your code where appropriate.
Extra credit opportunities
Before you try any extra credit, I recommend that you save a backup of your working program. Contact me if you plan to attempt any extra credit, and I will give you more details.
(5 points + more) Add sound to your program.
(15 points) Change the BattleshipGrid class to use enumerated types.
See Enums
and Enum Types.
More details.
(25 points) Do NOT attempt to do this extra credit until your main program
is completed and working. Change BattleshipGrid so that whenever an entire ship
is destroyed, a dialog box (using JOptionPane.showMessageDialog) pops
up telling you which ship was destroyed (e.g. "You sank my battleship!").
Feel free to combine this with a sound as well, if you did the first extra credit.