
Traffic Generation
Overview
This module introduces students to the principles of traffic generation using Tmix, a tool for generating realistic network traffic from captured packet headers.
Setup Time: Varies
Tutorial Time: 15 minutes
Objectives
Upon completing this module you will:
- Be able to run simple experiments with realistic traffic
- Be exposed to Tmix
Tutorial
A. Slice Creation and Instrumentation
This module assumes you are setup for and familiar with creating slices using the GENI Portal. Unlike some other modules it is not assumed that you already have a slice created, or resources allocated. Further, no instrumentation or GENI Desktop use is required for this module.
B. Video
If you haven't already, watch the video above. It will walk you through the steps of the module.
C. Setup
1. Login to GENI Portal and click create slice to create a new slice.
2. Click Add Resources. In the Choose RSpec area under the canvas select the existing RSpec GeniEdu-08 TrafficGen from the drop-down list.
3. In the canvas area select the Site icon, which will open a menu on the left. Select any InstaGENI aggregate from the drop-down list. Then click Reserve Resources at the bottom of the page.
4. The Resource Specification (RSpec) lists the details about the resources and links we are requesting. In some of the other tutorials we manually generated an RSpec. In this module we have created an RSpec for you, in which we request 2 Nodes, and a link between them. In addition the rspec loads a custom image on the nodes. The image has been configured with Tmix, a tool for replaying realistic network traffic.
5. Make note of the login information once the resources have been assigned. After they are assigned, it may take several additional minutes for the resources to become ready to use. When the resources are ready, the boxes representing those nodes will turn green on the Graphical View on the slice page.
6. While you wait, review the following information about Traffic Generation and Tmix, once the nodes are ready, continue to section D.
The performance of the Internet depends largely on the Internet protocols. Changes to existing protocols and new Internet protocols are constantly being proposed and implemented as the Internet continues to evolve. We can compare internet protocols to the rules of the road that govern vehicles. Changes to speed limits or traffic signals in the physical world must be studied before they are implemented, lest they result in accidents or traffic jams. Realistic simulations of vehicular traffic are needed to study the proposed changes. Similarly, realistic network traffic is desired to study the effects of changes to networking protocols. These new protocols must be tested and proven before they can be deployed on real networks. Experimentation, via software simulation or hardware emulation, has been the primary means for evaluating protocols. Generating realistic synthetic Internet traffic is a major component of creating effective experiments, and effective experiments will enable the continued improvement of Internet protocols.
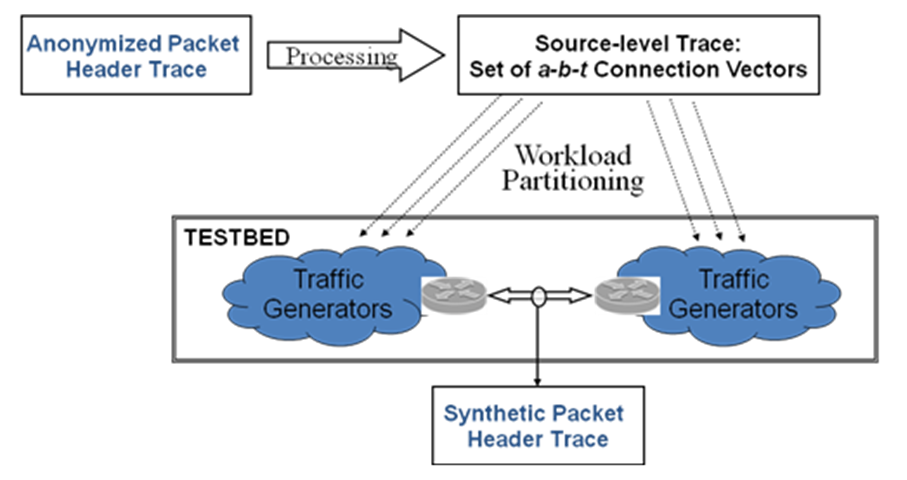
Rather than generate traffic which matches some mathematical model of real traffic, Tmix instead replays traffic collected from real network links. The Tmix system takes as input a TCP/IP packet header trace captured from a network link of interest. This trace is then compiled into a set of connection vectors, each of which represent a TCP connection of the trace, including the relative start time of the connection. Each connection vector is further divided into epochs, which represent the individual request/response interactions and wait times within the connections. At run-time Tmix uses this information to initiate TCP connections for each connection vector at the appropriate times. Both sides of these TCP connections are then controlled to read and write the correct amount of data to/from their sockets, and then sleep before continuing to simulate the next epoch. The image below shows the entire process from the input of a header trace to the output of a header trace collected from the traffic simulated by Tmix. Comparing the input header trace with the synthetic header trace reveals that the generated traffic is statistically similar to that observed on the real link. You can find more information about Tmix here.
D. Run Tmix
1. Open an SSH Terminal to each of the nodes using one of the various methods.
2. As described earlier, the image loaded on the nodes has the tmix tools already installed. To finish the Tmix setup issue the following command in each SSH terminal:
/local/tmix-script.sh
3. The script generated a tmix configuration file for each node. It also inserted a kernel module is to assist in simulating packet delays. List the contents of your home directory by typing:
ls
4. You should see a tmix.conf file, which contains the configuration for the tmix experiment. Open the file and browse its contents.
5. Tmix relies upon a pre-determined start time to synchronize tmix on the two nodes. On both nodes run the following command to determine the date and time:
date
6. Your nodes may be configured for a different time zone, than where you currently are. In the following commands enter times relative to those returned by the date command. Decide on a start time about 2 to 3 minutes in the future. It should be far enough in the future to allow you to issue the following next command below on both nodes, with 30 seconds to spare.
7. Execute the following command on both nodes:
tmix -s HH:MM:SS tmix.conf &
where HH:MM:SS is the chosen start time in hours (HH), minutes (MM), and seconds (SS).
8. Tmix on both hosts will load the data files and then wait until the designated start time. You will see "Running for ??? seconds" once tmix is ready to go. You will likely see a few warning messages output in spurts. This is normal.
9. Once the start time arrives, you may verify that tmix has started running by typing:
top
Top is a tool which, by default, lists the "top" processes, in terms of CPU usage, from among those currently running on a given computer. If you see tmix at the top of the list, then it has started, and is sending and receiving network packets in an effort to duplicate the traffic patterns which existed in the original TCP/IP header trace. To exit top, type 'q'. Not it is normal to see a few errors on the console as tmix runs.
10. After about 12 minutes the experiment will complete, a list of statistics will be output to the console, and a set of log files will generated.
Going Further - Assignment
1. Design an experiment in which you would use Tmix. What would your experiment test? Why would realistic traffic be desired? What traffic source would you collect a header trace from?
2. Using techniques described in the Instrumentation module run Tmix again but use GENI Desktop to graph the throughput as Tmix runs.
Shutdown
Upon completion of the module please delete your slice's resources as described in the Shutdown module.