
IPv6
Overview
This module gives students an opportunity to experiment with IPv6 and examine the differences between it and IPv4.
Setup Time: Varies
Tutorial Time: 20 minutes
Objectives
Upon completing this module you will:
- Understand the types and formats of IPv6 addresses.
- Have examined IPv6 headers and compared them to IPv4 headers.
- Have pinged between nodes using IPv6 connections.
Tutorial
A. Slice Creation and Instrumentation
This module assumes you are set up for and familiar with creating slices using the GENI Portal. Unlike some other modules, it is not assumed that you already have a slice created, or resources allocated. Further, no instrumentation or GENI Desktop use is required for this module. This module, however, does assume you are familiar with the general concepts of IPv4.
B. Video
If you haven't already, watch the video above. It will walk you through the steps of the module.
C. Setup
1. Login to the GENI Portal and click + New slice to create a new slice. Give it a name, perhaps <username>IPv6, then click Create slice.
2. Click Add Resources. Create 3 nodes by dragging the VM icon to the screen, name them A, B, and C. Connect the nodes as pictured below and select AutoIP or set the IP addresses as desired. Click Site 1, and select any InstaGENI aggregate. Finally click Reserve Resources.

3. Make note of the login information once the resources have been assigned. After they are assigned, it may take several additional minutes for the resources to become ready to use. To determine when the resources are ready, click Ready? on the slice page, when the status changes from Unknown to READY, the nodes are ready to be used.
4. Open an SSH Terminal to each of the three nodes using one of the various methods.
D. IPv6 Basics
In the 1990s, there was concern that the number of available IP addresses would soon run out if every device on the internet required its own address. In an attempt to solve this problem, the Internet Engineering Task Force (IETF) designed an update to the IP protocol, IPv6. IPv6 allots for 128 bits of addressing, allowing up to 2128 unique addresses, and way up from the 232 allotted in IPv4.
The transition from IPv4 to IPv6 has been slow. A transition flag day, in which all devices are shut down and switched over, was deemed impossible. Instead, devices are being gradually moved over to the new while also maintaining IPv4 functionality. The 10% implementation mark was passed fairly recently, in February of 2016.
In the meantime, there are two main ways of transition are dual stack or tunneling methods. The dual stack method makes every new device able to handle either protocol and able to transition between the two for older devices. This method means some information may be lost between transitions, as the two protocols do not have the exact same fields. Tunneling involves setting an IPv6 datagram as the data for an IPv4 datagram so that all the information is maintained but packet size increases.
E. Addressing in IPv6
1. In this section, you will read about the different types of IPv6 addressing and look at how your nodes are set up with addresses. IPv6 addresses have 128 bits, making for approximately 1038 addresses. This is enough addresses for every device to have a unique address many times over. Addresses are written in 8 sets of 4 hexadecimal digits as so:
fe80:ab70:0000:0000:0000:0000:0f68:9786
The addresses are commonly abbreviated by not writing leading zeros, and by cutting out a 4 digit set of 0s and replacing it with :: for as many as there are in a row. So the above address becomes:
fe80:ab70::f68:9786
2. Generally, the addresses are set up with the leading 64 bits for routing, with the first 48 of those
for global routing and the next 16 for internal subnets. The ending 64 bits are then for addresses of
interfaces or nodes.

3. Use the command ifconfig to see how the nodes you reserved are set up. Each node should have an IPv4 address and an IPv6 address.
4. Within the IPv6 addressing scheme, addresses are labeled by scope and function.
- IPv4 Compatible addresses begin with 96 zeros and then 32 bits of address to mimic an IPv4 style address.
- Global unicast addresses are uniquely assigned to a device and are routed on the internet. These addresses begin with 001 in the first three bits.
- Local unicast addresses are routed internally and not through the internet. These addresses begin with the 7 bits 1111 110.
- Link local addresses are not routed at all. These being with 1111 1110 10 as the first 10 bits. Note that the addresses you found in step 3 are link local as they begin with 1111 1110 or “fe”.
- Multicast addresses all begin with 11111111 or “ff”. We will use a multicast address in the next section. The next bits of a multicast address determine the scope of the address, for example ff02:: indicates a link local scope.
- IPv6 also supports anycast addressing, which IPv4 does not. Anycast addressing allows for a one-to-any connection. Instead of one node sending out data to many or all nodes like in multicast or broadcast, anycast addressing sends from one node to one node but the node it sends to can be any of a number of nodes specified under the anycast address.
F. Basic Connection
1. You will be trying some basic connections using ping6. You are likely familiar with the ping command that runs on IPv4, ping6 is very similar except it accepts and pings IPv6 addresses.
2. On your node A terminal, ping node A. Do this first using ping over IPv4. You can find the loopback address by typing ifconfig into your terminal. You should find that the loopback address for IPv4 is 127.0.0.1.
ping 127.0.0.1 –c 5
The –c flag tells ping 5 times. If you do not include the –c and need to stop pinging, type CTRL-C into the terminal to end the process. Find the IPv6 loopback address in the same way. It should be ::1. Think about how this address is abbreviated and what the full 128-bit address would look like. Note that this shorthand is not only for reading; it is also acceptable in use as an address.
ping6 ::1 –c 5
3. Next, we will use the multicast address to discover all link local neighbors. A multicast address is a type of address that allows one node to send to a set of other nodes with a certain property. It is different from a broadcast address that lets one node send to every node it can find without distinction. The multicast address we are going to use lets one node reach all other nodes connected by link local addresses, or all directly connected nodes. The address for this is set as ff02::1. You will need to specify which interface the message should go out on, for example, your outgoing link may be labeled “eth1”. You can check interface names using ifconfig. Ping the multicast address, replacing <link-name> with the actual link name.
ping6 –I <link-name> ff02::1 –c 105
Make note of what addresses respond. Use ifconfig on node A and node B to try to figure out where some of the addresses are coming from.
4. Using one of the addresses that responded in part 3, directly ping to that address.
ping6 –I <link-name> <IP6-address> –c 5
Note that you still must specify which link you are using. As discussed earlier, this is because in IPv6, link local addressing does not involve routing, so you must specify the outgoing interface.
5. Try to ping from node A to node C (or between whichever of your two nodes are not directly connected by a link). Remember you can find all the addresses registered to a node using the command “ifconfig”. This pinging fails because for the moment, you are using link local addressing and have not advertised any additional routes. Thus, the only available routes are directly through a link.
G. Examine Headers
1. You will be examining the difference between IPv4 and IPv6 headers in this section. To do this, you will be using “tcpdump”. This program prints out network traffic. In the command below, “sudo” gives you permission to run this, “-v” makes the output verbose, and “-i” allows you to specify which interface to grab traffic from. On node A, startup tcpdump using the following command:
sudo tcpdump –v –i <outgoing interface>
2. Next ping node A from node B over IPv4 (remember you can use ifconfig to get addresses and link names):
ping <node A IPv4 address> -c 5
3. Then, ping node A from node B over IPv6:
ping6 –I <outgoing link name> <node A IPv6 address> -c 5
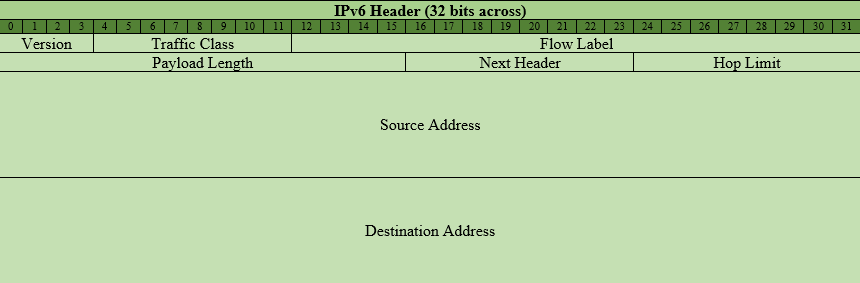
4. Take some time to look at the differences between the two sets. In particular, be sure to note the following changes.
- The IPv6 headers have a “flow” field. This field is somewhat tenuously defined at this point, but is intended to be used for time important transfers like videos or calls.
- IPv6 headers have no options and thus have a standard size of 40 bytes, while IPv4 headers can vary in size. If options are needed, they are pointed to in the next header field. Therefore, IPv6 headers do not have a header length field.
- Various field names have been updated to better reflect their usage, i.e. “type of service” in IPv4 corresponds to “traffic class” in IPv6.
- IPv6 does not support fragmentation unlike IPv4. If the packet is too big, an ICMP message is sent and the packet must be reformatted before sending.
H. Use a 'Global' Type Address
1. In this section, you will assign global type addresses to nodes A and B so that you can ping between them without having to specify the interface.
2. Pick an IPv6 address in the global scope to add. Remember that global unicast addresses begin with 001 in the first three bits. As a suggestion, the range 2001:0db8::/32 has been reserved for documentation and examples. The address you pick will not be broadcast to the internet so do not worry about any overlap. Then use the following command to add the address to node A.
sudo ip -6 addr add <ip6-address>/64 dev <outgoing-link-name>
The -6 tag indicates we are using the ip command to add an IPv6 address, and dev with the link name specifies the device we are adding the address to. The /64 is because the last 64 bits are reserved for node/interface addressing. Use ifconfig to confirm that the address has been added and note that the address is listed as type global.
3.Try using ping6 to ping the address from node A (i.e. ping yourself):
ping6 <ip6-address> -c 5
4. The address has not been set to advertise to anyone else. Verify this by checking the routing table for IPv6 using the following command:
ip -6 route
5. Next, you will set up a route to be advertised. Truncate the IPv6 address you chose to the first 64 digits and append “/64” so that you add the routing portion. For example, if you chose 2001:db8::1 as your address, then you would use 2001:db8::/64 as your truncated address. Use the following command:
sudo ip route add <truncated-ip6-address>/64 dev <outgoing-link-name>
Make sure to use the same ip address and link as before. Verify the route by checking the routing table once more.
6. Run through steps 2-5 again on node B, but using a different address than for node A (make sure to add both an address and add an entry to the routing table).
7. Now try pinging from node A to node B using the new addresses. Note that you do not have to specify an interface to ping on this time because you have added routing information. You will not be able to ping these addresses from any node without the specified routing information nor from the general internet because the routing is not set up for that.
Going Further - Assignment
Part 1
Return to part H. Set up the third node with a global address and set the routing information so you can ping freely between the nodes. If turning this in for a grade, specify what commands you used and why, and what the resulting routing tables looked like.
Part 2
Return to section G. Repeat the experiment and see what other differences you can find in the headers. See if you can match each piece of the header you find to the pieces in the diagrams of the two header types below. You will probably not see each field come up in the tcpdump output.

If you are turning this in for an assignment, then answer the following questions.
- What other major differences do you notice between the two headers?
- IPv6 does not include a checksum field. Why is this field not necessary? In what major cases does this save time?
- What are the advantages of a fixed length header over the variable length header?
- Why might IPv6 not support fragmentation?
- If an IPv6 packet is translated to an IPv4 packet (translation approach) instead of wrapped inside one (tunneling approach), what information would be lost?
Shutdown
Upon completion of the module please delete your slice's resources as described in the Shutdown module.