
For this assignment, I decided to tackle RenderMan. While I have had a tiny bit of experience with shaders, I have never used RenderMan and figured it was a good tool to know. Also, in the process I would hopefully gain a better understanding of shaders. To expand my shader experience, I tried my hand at making a cartoon shader which I don't have any experience with and seemed like a hot topic given the last couple of classes.
To get started, I downloaded some models off a website suggested in the resources. I had a little trouble getting RenderMan to function at first, but after some tinkering I finally got it working. The model I decided to play around with was the Utah teapot, because it is an icon for testing things (plus it looks pretty cool). The model I downloaded came with crappy colors and a black background, which I didn't care for. So my first goal of learning RenderMan was to learn how to fix this. Changing the color of the object was trivial, but I couldn't find a setting for background color anywhere. I ended up creating a polygon in the background colored with the color of my choice. Below there is an image that shows the teapot shaded with the default plastic shader.
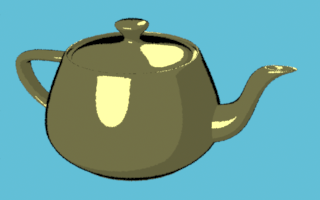
After I got this working, I tried to make a cartoon shader. The basic idea behind the cartoon shader is to quantize all the colors on a surface to about 3 different colors. To accomplish this I applied diffuse shading to the object and used a filter to quantize the colors produced into 2 bins. I then did the same with specular shading and added the results. Once all the color components were added up, the object had 3 quantized colors. From here, the basics of the cartoon shading were done, but outlines are what really make it look cartoony. To achieve outlines I first tried the naive approach, which is to take the dot product of the surface normal and the camera vector. The edge of an object should be defined by where this dot product is zero. Therefore, if we color values within a certain threshold of zero to black, we should get an outline. An attempt at this is shown below. As you can see, this approach gives bad outlines. The outlines are rarely uniform and look more like diffuse shading than an outline. This is because the threshold allows the shape of the object to determine the line thickness, which we don't want. We would rather specify the line thickness.
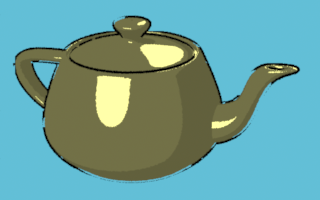
Once I realized how bad this technique was, I tried something else. I had read about displacement shaders in a tutorial and thought perhaps I could make an outline by "growing" the object beyond its normal boundary and coloring this excess black. To accomplish, I first made a duplicate of the model in the RIB file. In my final RIB file there are actually two teapots that are identical except for the shader that is applied to them. For this duplicate model I made a new shader that used the displacement shader to expand the size of the object along the surface normal by a specified amount. In theory this should have made a teapot that was a "thicker" version of the original teapot. For some strange reason this didn't work quite right. As the object expanded it seemed to expand with a strange pattern, so that not all parts of the surface expanded equally. I don't know why this occurred and I imagine other models would handle this better. After I expanded the model however, the new model was blocking out the old model. To fix this and get the outline look, I simply did the equivalent of front-face culling. Basically, I compared the normal to a front-facing version of the same normal, and if they matched I set the opacity to 0. Now what we had was the original teapot with the back-faces of the expanded teapot behind it. When the expanded teapot is colored black, it gives and outline effect. This can be seen below. I imagine this technique would work very well if it weren't for the strange displacement problem. On the upside though, the strange displacement problem does create an interesting artistic effect that is cool looking on its own. Another interesting observation is that this approach seems to capture some sharp edges too.
| Utah Teapots | ||
|---|---|---|
| Plastic Shader | My Toon Shader with Normal-based Outline | My Toon Shader with Displacement Outline |
|
|
|
The only problem I really encountered besides getting the thing to run was in working with the cartoon outline. For some reason the displacement shader was not working correctly for me. As I applied displacement, the model seemed to break apart (explode instead of expand) causing weird patterns and gaps in the outline. One could argue that it is a neat artistic effect anyways. Also, this may be a model specific problem. I didn't investigate further.
This is my modified model RIB file of the Utah teapot: uteapot.rib
This is my cartoon shader responsible for the 3 shades on the teapot: toon.sl
This is my cartoon outline shader which tries to put a black outline around the teapot: toonline.sl
Grading information and comments can be sent to  .
.