
GENI Setup
Overview
This module introduces the basics of GENI Portal to users. It walks users through the process of creating a slice, designing a network, and adding resources to a slice.
Tutorial Time: 20-25 minutes
Objectives
Upon completing this module you will:
- Be able to log in and create a slice using GENI Portal
- Be able to use GENI to design a simple network and reserve resources
- Become familiar with GENI terms and the GENI workflow
Quick Setup
Those who have completed this setup tutorial previously, or who are already comfortable with GENI may use the following quick setup steps. Otherwise, please continue with the full tutorial below.
- Log in to the GENI Portal (http://portal.geni.net).
- Create a new slice.
- Either
- Add resources and select the appropriate rspec for the module you wish to complete (GeniEdu-##, where ## is module number)
- or do the following:
- Create a network containing:
- two InstaGENI VMs and
- a link between them
- Change:
- Name the nodes "client" and "server"
- Configure the network with client interface IP: "10.1.1.1" Netmask: "255.255.255.0"
- and server interface IP: "10.1.1.2" Netmask: "255.255.255.0"
- Create a network containing:
- Then, select an InstaGeni aggregate and click Reserve Resources.
Tutorial
A. Video
If you haven't already, watch the video above. It will walk you through the steps of the module.
B. SSH Client
We recommend that you use an SSH Client for some of the modules. See the options below for your operating system.
Mac OS X/Linux
- Mac OS X and Linux come with an ssh client you can run from a Terminal window. You do not need to install anything.
Windows
- Install PuTTY, a free SSH client for Windows: PuTTY
- Install FireSSH, a Firefox ssh plugin (requires the Firefox browser): FireSSH
C. Log in to the GENI Portal
1. Open a browser window and go to the GENI Portal (http://portal.geni.net).
2. Click on the Use GENI button.

3. Next you will be asked which organization you are affiliated with. If your organization is listed as a suggested selection, click on the name or logo of your institution. Otherwise, begin typing the name of your school or organization in the text box. As you type, a list of matches will appear. Select your organization, then click continue. If you are not affiliated with any of the listed institutions fill out this form to request access.

4. You should now be asked to enter credentials for your institution or organization. This is likely the same username and password that you use for other services at your institution. Enter your credentials and then click to continue.
5. (Only first login) If this is your first time logging in to GENI you will be taken to a form and an activation page. Complete the form and press Continue, and check both checkboxes and then press Activate. You will be taken to your GENI Portal home page.
D. Generate and Download SSH Keys
1. GENI utilizes SSH keys to grant access to its network resources. If you already have SSH keys shared with GENI Portal, skip to section E, Create Slice, otherwise continue.
2. Hover over your name in the upper right-hand corner of the page, and then click SSH Keys.
3. Click generate and download an SSH keypair
4. To generate a new SSH key pair, type a Passphrase in the text box, and re-type it in the Confirm Passphrase text box. Click Generate SSH private key to proceed. You will need to remember your chosen passphrase and use it when logging-in to nodes and when entering the GENI Desktop.

5. If the key was generated successfully, you should now see a message indicating success. Click on the SSH Keys tab. You should now see the key pair in your SSH Keys list.

6. Download your private SSH key so it can be used to login to your GENI resources using an SSH Client. Follow the instructions below for your operating system and SSH client.
Mac OS X/Linux
- Click the Download Private Key button.
- In a command line terminal, move your key to the appropriate location and ensure that it has the right permissions by typing the following (replacing ~/Downloads/ with actual location if necessary):
- Finally, add this key to the authentication agent by typing:
mv ~/Downloads/id_geni_ssh_rsa ~/.ssh/
chmod 0600 ~/.ssh/id_geni_ssh_rsa
ssh-add ~/.ssh/id_geni_ssh_rsa
Windows PuTTY
- Click the Download PuTTY Key button, and save the key to your computer.
- If desired, move the key to a directory of your choice. Later you will need to remember the location of the key.
Windows FireSSH
- Click the Download Private Key button, and save the key to your computer.
- If desired, move the key to a directory of your choice. Later you will need to remember the location of the key.
7. Click on the Home tab to continue.
E. Create Slice
1. Click on the "+ New slice" button, and then from the drop-down list select the name of the project in which to create the slice. A slice is a container for GENI resources. You can create multiple slices within the GENI project.

2. Choose a name for your slice. This name will be public, and needs to be unique among all the slices in the project. To ensure uniqueness, it is recommended that the slice name begin with your username (used above to log in) and be followed with a descriptive string. For example, if your username was smith, and you were creating a slice for the web server module you might choose smithWebServer as your slice name. Enter your slice name and a description of the slice (optional) in the text boxes, and then click the Create slice button.

3. Assuming the slice was successfully created, you will be taken to the slice page. Here you can add and delete resources, access various tools, and view the status of the slice.
F. Reserve Resources
1. Click on the Add Resources button to open a window where you can add nodes and connections to your network.
2. You should see a window with several icons on the left and a canvas area on the right. Drag the icon labeled "VM" to the canvas. This will add a default Virtual Machine to your network design.
3. Repeat the previous step to add another node to the canvas. You can move the nodes anywhere on the canvas by clicking on the node and dragging.
4. Next, create a link between the two nodes. Start by placing the cursor near one of the nodes. When you see a line extending from the node, click and drag to the other node, then release. This will create a Local Area Network (LAN) connection between the nodes.
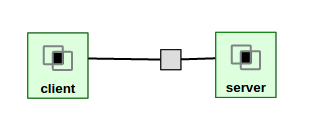
5. Click on one of the nodes in the canvas. This will open a node property display. At the top of the properties screen is the name of the node. Change the name to "client". Notice there are several other properties of the node which can be changed.
6. Repeat step 5, but click on the other node and name it "server".
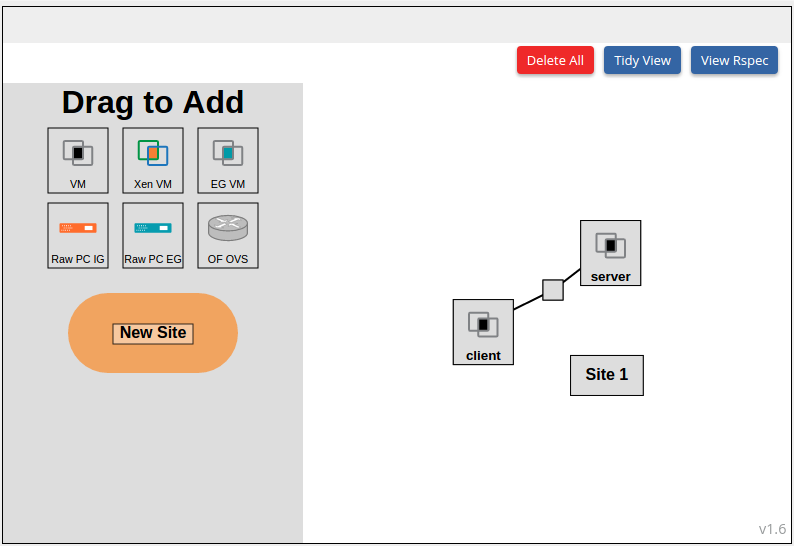
7. Click on the square on the line between the two nodes. This will open a display of the link properties. Scroll down to the interfaces section. Change the IP for the "interface to client" to 10.1.1.1 and a netmask of 255.255.255.0.
8. Repeat step 7, for the "interface to server", assigning it an IP of 10.1.1.2 and a netmask of 255.255.255.0.
9. Now, click on Site 1 on the canvas. This icon represents the site at which these resources will be allocated. Clicking it will open a display of the site properties. Using the drop-down list under aggregate, select a GENI aggregate you want to reserve your resources at. For these modules we recommend using one of the InstaGENI aggregates (any whose name ends in "InstaGENI").
10. If you plan to use GENI Desktop to analyze your slice, you need to add a Global Node. (If in doubt, go ahead and add one). To add a global node click the "Add Global Node" button in the Editor Ops section below the canvas. This will add an additional node to your canvas.
11. Finally, click the Reserve Resources button at the bottom of the page.
12. Your requested resources are now being allocated. You will be taken to a new webpage, and after several seconds (about 25 seconds) the Results section of the page will display the details for the resources allocated to your slice. You may wish to make note of the login information for each of the nodes. It will be needed later to login to the nodes.
13. The allocated resources are still being provisioned, and booted, and may not yet be available for use. Please be patient; it may take several minutes for the process to complete. Click on the "Back to Slice <slicename>" link at the bottom of the page. Once loaded, scroll down to the Manage Resources display. When your resources are ready they will turn light-green in this display. If you encounter errors, you may wish to closely follow the instructions above again to create another new slice, but instead select resources from different aggregates. If problems persist, contact your instructor, or seek help at geni.net.
G. SSH to Resources
1. To log in to the allocated resources you can either utilize an SSH client, or Instrumentize your slice and use GeniDesktop to log in. To establish an SSH session, follow the appropriate instructions below for each resource:
Mac OS X/Linux
- In a command line terminal, start SSH by typing:
ssh <username>@<hostname> -p <port number>
or alternatively, if your key is not added to the authentication agentssh -i <private key location> <username>@<hostname> -p <port number>
- Likely this is your first time connecting to the resource, if so you will be notified that the authenticity of the host can't be established, type yes and press Enter to continue connecting.
- When prompted, enter the passphrase you chose when generating your key pair (some systems may incorrectly call this this password to unlock the key). Note: If you are prompted for a password then something went wrong. Make sure that the login information and passphrase are correct.
Windows PuTTY
- Run PuTTY.
- On the Basic options screen, in the Host Name field enter: <username>@<hostname>
- In the Port field enter: <port number>
- Make sure Connection type is: SSH
- Under the settings categories on the left navigate to Connection-> SSH ->Auth.
- Next to the "Private key file for authentication" field at the bottom, click Browse... and select the private key file you saved to your computer, and click Open.
- Click Open to establish the SSH connection.
- Likely this is your first time connecting to the resource, if so you will be prompted about whether you trust the host (key not cached in registry), click Yes.
- When prompted for the Passphrase enter the passphrase you chose when generating your key pair.
Windows FireSSH
- Load this URL into firefox (with the FireSSH plugin installed): ssh://<username>@<hostname>:<port number>
- In the pop-up window, enter the passphrase you chose when generating your key pair in the (mislabeled) password field, and click Browse...
- Select the private key, and click Open.
- Click OK.
- Likely this is your first time connecting to the resource, if so you will be prompted about whether you trust the host (host key not cached in registry), click Yes.
GENI Desktop
- To instrumentize your slice and open SSH terminals to the nodes continue with the instrumentation module.