Due Friday, March 2, 2018, 11:59 PM, Sunday, March 4, 2018, 11:59 PM
For this exercise, you will first write a MIPS assembly program to convert a color image (in PPM format) to grayscale (PGM format). A C version of the program (ex1.c) is provided; study it carefully and then convert it line-by-line to MIPS assembly.
For this exercise, we will use the ASCII file formats of type PPM (color) and PGM (grayscale). For a detailed description of these file formats, please see the Wikipedia entry on Netpbm format. A short description is given below.
The format of a PPM or PGM file is as follows:
Additional Formatting Specifications for This Exercise: Since the MIPS input/output routines (syscalls) available in MARS are somewhat limited, we will put further restrictions on the format of PPM/PGM files as follows:
There are a number of free/open-source viewers available for displaying PPM/PGM image files, including:
The C version of the program is provided (ex1.c). It reads a PPM image (on its standard input, i.e., keyboard), and outputs its corresponding PGM image (on its standard output, i.e., console). Keep in mind the following:
Gray_Value = ((R*30 + G*59 + B*11) * 255) / (100 * PPM_MAX) ex1 < ex1in1.ppm > ex1result1.pgm
Copy the PGM output to your laptop and view it in GIMP
The PGM output is the grayscale version of the PPM inputWrite an equivalent MIPS assembly program that implements the same conversion from PPM to PGM images. The best strategy would be to convert your C code (pretty much line-by-line) into its assembly equivalent. A starter file is provided (ex1.asm). Be sure to follow the structure outlined in the starter file. Specifically, your main procedure must call the procedure rgb_to_gray, just as in Lab 6.
TIP: Your program does not (in fact, should not) need to store the entire image in an array. Simply read RGB values of a pixel, and output its gray value, and repeat over the entire image. There is no need at all to create an array to store all the pixel values.
Name the file containing your assembly program ex1.asm. Run your program in MARS and verify that it is working correctly. For some reason, cutting-and-pasting the contents of an input file into the Mars "Run I/O" window does not always work as expected; this is likely due to a bug in the Mars implementation.
Small Examples: To make it easy to manually enter the input, the file (ex1in1.ppm) is small enough for you to type it in. Do the following:
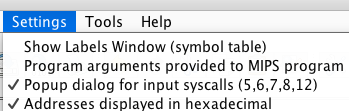
Change the Mars settings to enable popup dialog boxes for entering input.
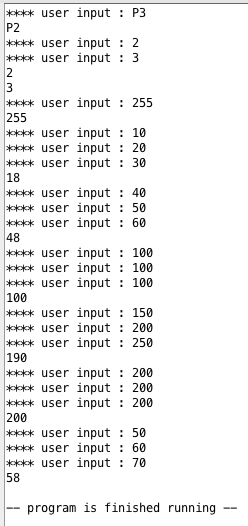
Now run your program, and manually enter the contents of the input image in the dialog boxes, one line at a time, starting with "P3", then "2", "3", "255", etc. You will see the following output in Mars:
Larger Examples: For the larger examples, it is quite cumbersome to enter them line by line into Mars. Therefore, you will need to run your program in command-line mode and use input/output redirection.
If you are developing your code on a Mac/Linux machine, you can use the following command on your computer within a terminal window without logging onto classroom.cs.unc.edu (replace /path/to with the actual path to Mars, e.g., /Users/yourid/Desktop/Mars/Mars4_5.jar):
% java -jar /path/to/Mars4_5.jar nc mc CompactDataAtZero ex1.asm < ex1in1.ppm > ex1result1.pgmIf you are using a Windows machine (or even Mac/Linux), you can login onto classroom.cs.unc.edu, copy your work there, and then run the following command:
% java -jar /home/porter/comp411/bin/Mars4_5.jar nc mc CompactDataAtZero ex1.asm < ex1in1.ppm > ex1result1.pgm(For more information on running MARS in command-line mode, please see https://dpetersanderson.github.io/help/MarsHelpCommand.html.)
The expected output for the ex1in1.ppm example when run in command-line mode is:
P2
2
3
255
18
48
100
190
200
58
Try the larger examples. First view the output file using GIMP or IrfanView (on Windows or Mac) or Preview on Mac. The PGM output should look like a grayscale version of the PPM input. Make sure the PGM output has the same overall brightness as the input; otherwise check PPM_MAX. If it passes visual inspection, check it against the sample output provided using the diff command and the selfcheck script.
In this exercise, you will be given a color image, along with the coordinates of a rectangular box. Your task is to keep the pixels within the box as they are, but change the pixels outside the box into gray values. The net effect is to mask the color in the picture outside the box (turn it gray).
As an example, say a pixel outside the box has RGB values of 10, 20 and 30, respectively. Then its gray value, according to the formula used in Exercise 1, will be 18. However, since the output is a color image, this gray pixel will be represented using the RGB value of 18, 18 and 18, respectively (for gray pixels, from pure black to pure white, R=G=B).
First write a program in C and then in assembly. Remember the output will be a color image (PPM, not PGM), and therefore will have "P3" in its header. No templates are provided; you may want to follow the general structure/style of your program for Exercise 1. The program will read four integers from the standard input, one per line as follows:
                x1
                x2
                y1
                y2
These numbers represent the coordinates of the box inside which color is to be maintained. That is, the top-left corner of the box will be (x1, y1), and the bottom right corner will be (x2, y2). You can assume that x2 >= x1 and y2 >= y1, and that these values will be within the bounds of the actual image (so no error checking needed). The colored part of the image will include all the columns from x1 to x2 (inclusive), and all the rows from y1 to y2 (inclusive). Outside of these bounds, the pixels will be turned into their gray equivalents. The numbering starts with the top-left corner of the image with (x,y) = (0,0), and ends at the bottom-right corner with (x,y) = (cols-1, rows-1), where cols is the number of colums and rows is the number of rows in the image.
The input will consist of the four integers as above, followed by the contents of the PPM file but without the "P3" line in the header (to make things easier, because reading a string after an integer requires eating a newline first). The output should be the contents of the transformed image, in PPM format. Assume that the PPM_MAX will be 255 for all the input files, and also for your program's output.
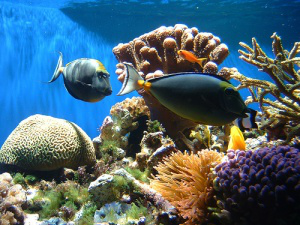
As an example, suppose the input is the picture below, along with the box coordinates top-left=(100, 20) and bottom-right=(250, 130):
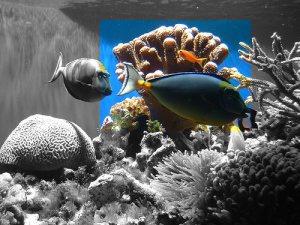
Then the output will be:
TIP: Once again, your program does not (in fact, should not) need to store the entire image in an array. Recoloring simply can be done by reading one pixel at a time, deciding whether it belongs in the box or not (based on its row and column number), and then printing its original RGB value or the modified RGB value (the gray equivalent), respectively. There is no need at all to create an array to store all the pixel values.
Name your C program ex2.c and the assembly ex2.asm.
The first sample input (ex2in1) is small enough for you type into the terminal or MARS console. For the larger examples, you will need to run your program in command-line mode and use input/output redirection, as follows. For the C program:
% ex2 < ex2in1 > ex2result1.ppmAnd the assembly program:
% java -jar /home/porter/comp411/bin/Mars4_5.jar nc mc CompactDataAtZero ex2.asm < ex2in1 > ex2result1.ppmPlease do view all output files using GIMP/IrfanView/Preview. If it looks good, then you may check it against the sample output provided using the diff and the selfcheck commands.
Sample inputs and corresponding outputs are provided under /home/porter/comp411/samples/lab7. Make sure the program's output is identical to that in the sample output files.
Your assignment must be submitted electronically by 11:59pm on Friday, March 2, 2018Sunday, March 4, 2018.
First copy the files ex1.asm, ex2.c and ex2.asm to the CS Dept server (classroom.cs.unc.edu) under the appropriate folder in your home directory (e.g., comp411lab/lab7). Then, run the self-checking and submit scripts:
% /home/porter/comp411/bin/comp411start
% cd ~/comp411lab/lab7
% selfchecklab7
% submitlab7
Yes, from now on, you don't need to type the full path before the selfchecking and submit scripts, if you invoke the comp411start command first.
In case of any problems, please contact the instructor or the TAs.
Last updated: 2025-05-14 07:36:53 -0600 [validate xhtml]